In this guide, we are going to look at the setup of a cisco network using 802.1x wired authentication.
This lab consists of the following:
- lab-dc01 - Windows Server 2019 AD-DS Server with AD-CS Roles
- lab-frad01 - Ubuntu 22.04 server for running FreeRadius
- dot1x-rtr - Cisco C1111-4P Router to connect clients to. This router has a built-in switch
- tst-lpt - Windows 11 Client to test the connection to the network, domain joined to the lab.local domain
FreeRadius EAP-TLS Setup
In order to have FreeRadius authenticate based on certificates, we need to setup the eap module with some certificate information.
On the fresh install of Ubuntu 22.04, you can install FreeRadius directly using apt:
sudo apt install freeradiusOnce it is installed, we need to generate some certificates which will be classed as the server certificate. That is, the certificate that is presented to the client when connecting.
Create a csr request file using the following:
cat << 'EOF' > req.conf
[req]
distinguished_name = req_distinguished_name
req_extensions = v3_req
prompt = no
[req_distinguished_name]
C = GB
ST = State
L = Locality
O = Test LAB
OU = IT
CN = lab-frad01.lab.local
[v3_req]
keyUsage = keyEncipherment, dataEncipherment
extendedKeyUsage = serverAuth
subjectAltName = @alt_names
[alt_names]
DNS.1 = lab-frad01.lab.local
EOF
Replace the instances of lab-frad01.lab.local and the other location and org information to match your requirements.
Next we need to create a certificate signing request from that request file:
openssl req -new -out lab-frad01.lab.local.csr -newkey rsa:2048 -nodes -sha256 -keyout lab-frad01.lab.local.key -config req.confThis should generate you two files, lab-frad01.lab.local.csr and lab-frad01.lab.local.key
Cat the output of lab-frad01.lab.local.csr, it should resemble base64:
nick@lab-frad01:~$ cat lab-frad01.lab.local.csr
-----BEGIN CERTIFICATE REQUEST-----
MIIDCDCCAfACAQAwbzELMAkGA1UEBhMCR0IxDjAMBgNVBAgMBVN0YXRlMREwDwYD
...
pr27+OsuuFMQLBfZ
-----END CERTIFICATE REQUEST-----
We need to take this output and use it to generate the certificate on the AD-CS Server.
In my case, I have installed the web enrolment part of the AD Certificate Services role, so I can go to http://lab-dc01.lab.local/certsrv:

Click on Request a certificate and then advanced certificate request at the bottom of the page.
You should see the following:
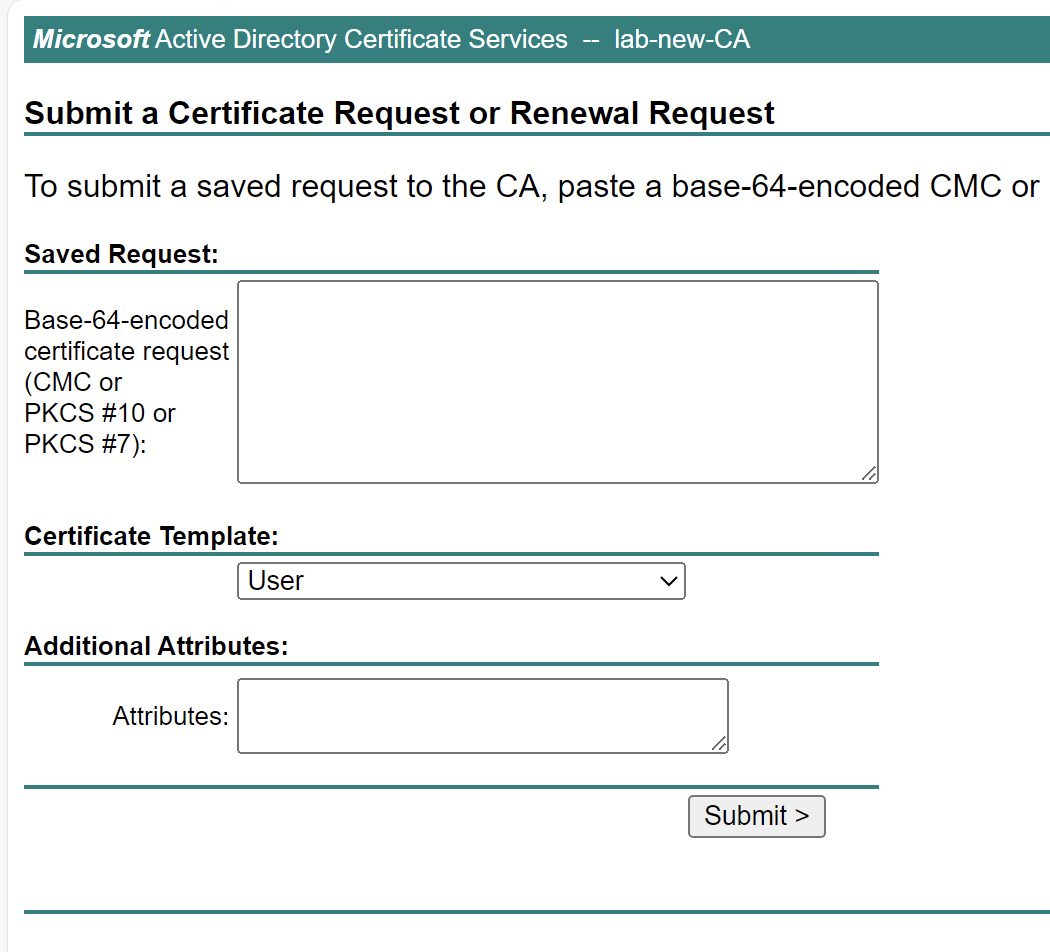
Copy and paste the contents of the lab-frad01.lab.local.csr file into the top box and select Web Server as the Certificate Template. If this is not visible, you may have to ensure its published into Active Directory on the CA Server.
Click on Submit and the certificate should get signed:
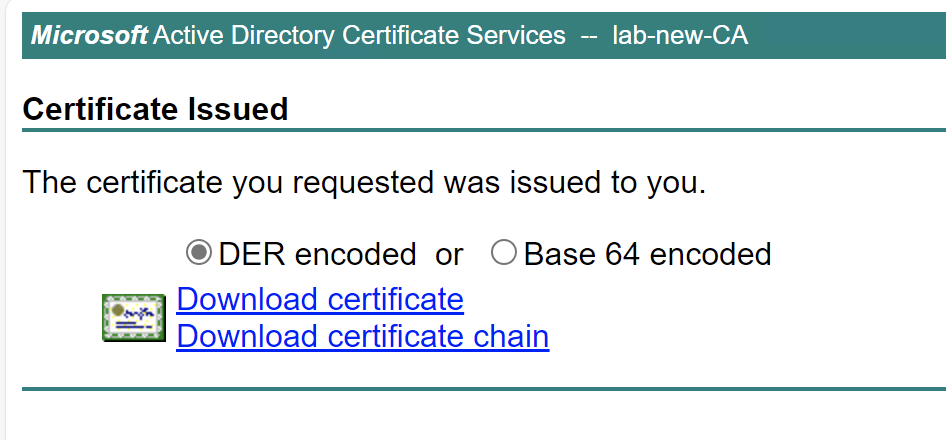
Change the selector to 'Base 64 encoded' and download the certificate. We will move this back onto lab-frac01 and call it lab-frad01.lab.local.cer.
Finally, we need to get the CA in base64 form too. Open the certificate that you just generated in Windows and to go the Certification Path tab:
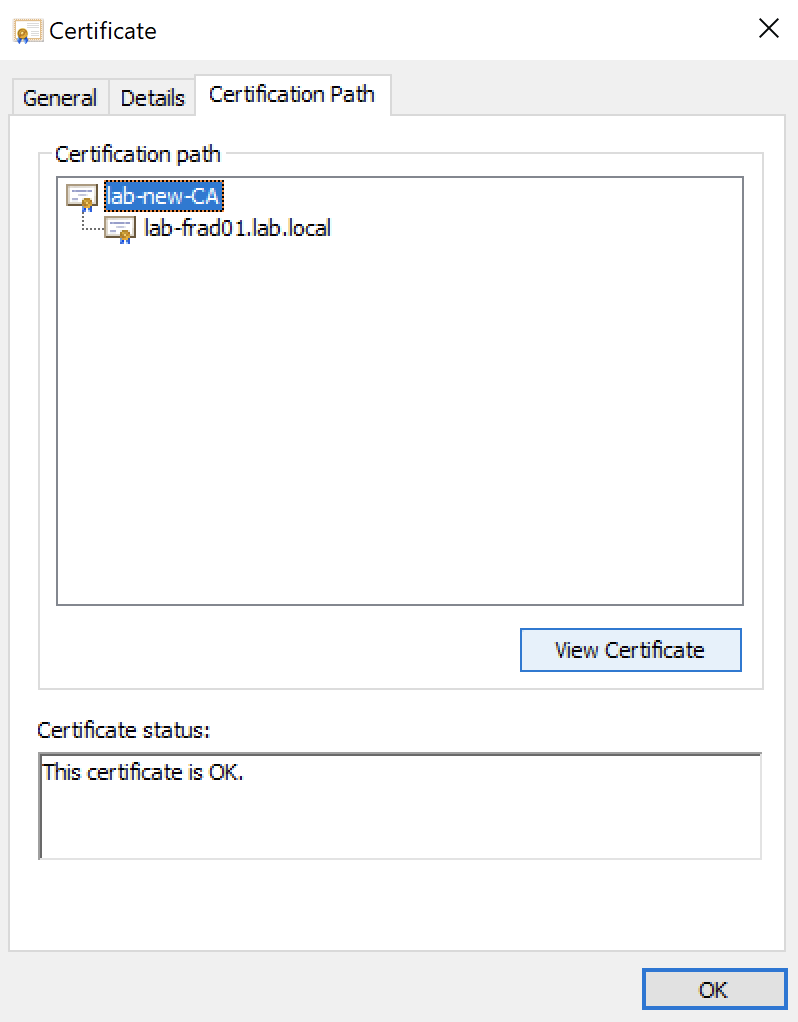
Click on the Certificate Authority at the top and then click 'View Certificate'. On that window, go to the 'Details' tab and then click 'Copy to file'.
Click Next, select Base-64 encoded and save this locally. It should be copied to the freeradius server too, we will call this lab-root-ca.cer.
Thats all the certificates we need generated and copied across now. For completeness, you can delete the .csr file but its worth keeping the req.conf file for future reference as you will need to renew this certificate at some point.
We need to move these certificate files so that FreeRadius can use them in its configuration:
mv lab-frad01.lab.local.cer /etc/freeradius/3.0/certs/
mv lab-frad01.lab.local.key /etc/freeradius/3.0/certs/
mv lab-root-ca.cer /etc/freeradius/3.0/certs/
You will have to do that either as root or with superuser permissions as the freeradius folder is not accessible for standard users.
Now we need to edit the eap configuration file to specifically call out these files.
Edit the file /etc/freeradius/3.0/mods-available/eap using your favorite CLI text editor.
Firstly, we need to change default_eap_type from md5 to tls:
Then under tls-config tls-common, we need to set the following attributes:
private_key_file = /etc/freeradius/3.0/certs/lab-frad01.lab.local.keycertificate_file = /etc/freeradius/3.0/certs/lab-frad01.lab.local.cerca_file = /etc/freeradius/3.0/certs/lab-root-ca.cer
private_key_password can be commented out with a # as we didn't specify a password for it.
You should now be able to restart the freeradius service:
sudo service freeradius restartAnd it should restart without any issues. If you have problems starting the service, you can use freeradius -X to run it interactively and see what the problem is. It's normally very good at that!
Last thing we need to do with FreeRadius is to create a client for the switch:
Edit /etc/freeradius/3.0/clients.conf and add the follwing to the end of the file:
client dot1x-rtr {
   ipaddr = 192.168.0.180
   secret = cisco123
}
And restart freeradius again!
Thats all of the FreeRadius setup done.
Cisco Configuration
We need to setup the Cisco device with its dot1x configuration and point it at the FreeRadius server.
Enter the following commands in configuration mode:
Note: Enabling aaa is global across the device, if this isn't already enabled, you may see changes to how you can authenticate to your device.
! Enable AAA syntax and commands
aaa new-model

! Create radius server object for freeradius
radius server lab-frad01
 address ipv4 192.168.0.181 auth-port 1812 acct-port 1813
 timeout 2
 retransmit 1
 key cisco123

! Create group and reference radius server
aaa group server radius dot1x-auth
 server name lab-frad01

! Point 802.1x auth to the RADIUS Group
aaa authentication dot1x default group dot1x-auth
aaa accounting dot1x default start-stop group dot1x-auth
aaa authorization network default group dot1x-auth

! Enable 802.1x
dot1x system-auth-control

! I need to do this in my case because im using an SVI
ip radius source-interface Vlan1
There are loads of configuration parameters for the interfaces themselves, but this base configuration will get the port working with 802.1x:
interface GigabitEthernet0/1/0
 switchport mode access
 authentication port-control auto
 dot1x pae authenticator
AD-CS Auto Enrolment
In order for a machine on our network to be able to authenticate with FreeRadius, it needs a certificate, as do our users. In order to have these automatically generated, we need to configure auto enrolment.
On your AD-CS server, navigate to the Certificate Templates and right-click to manage them:
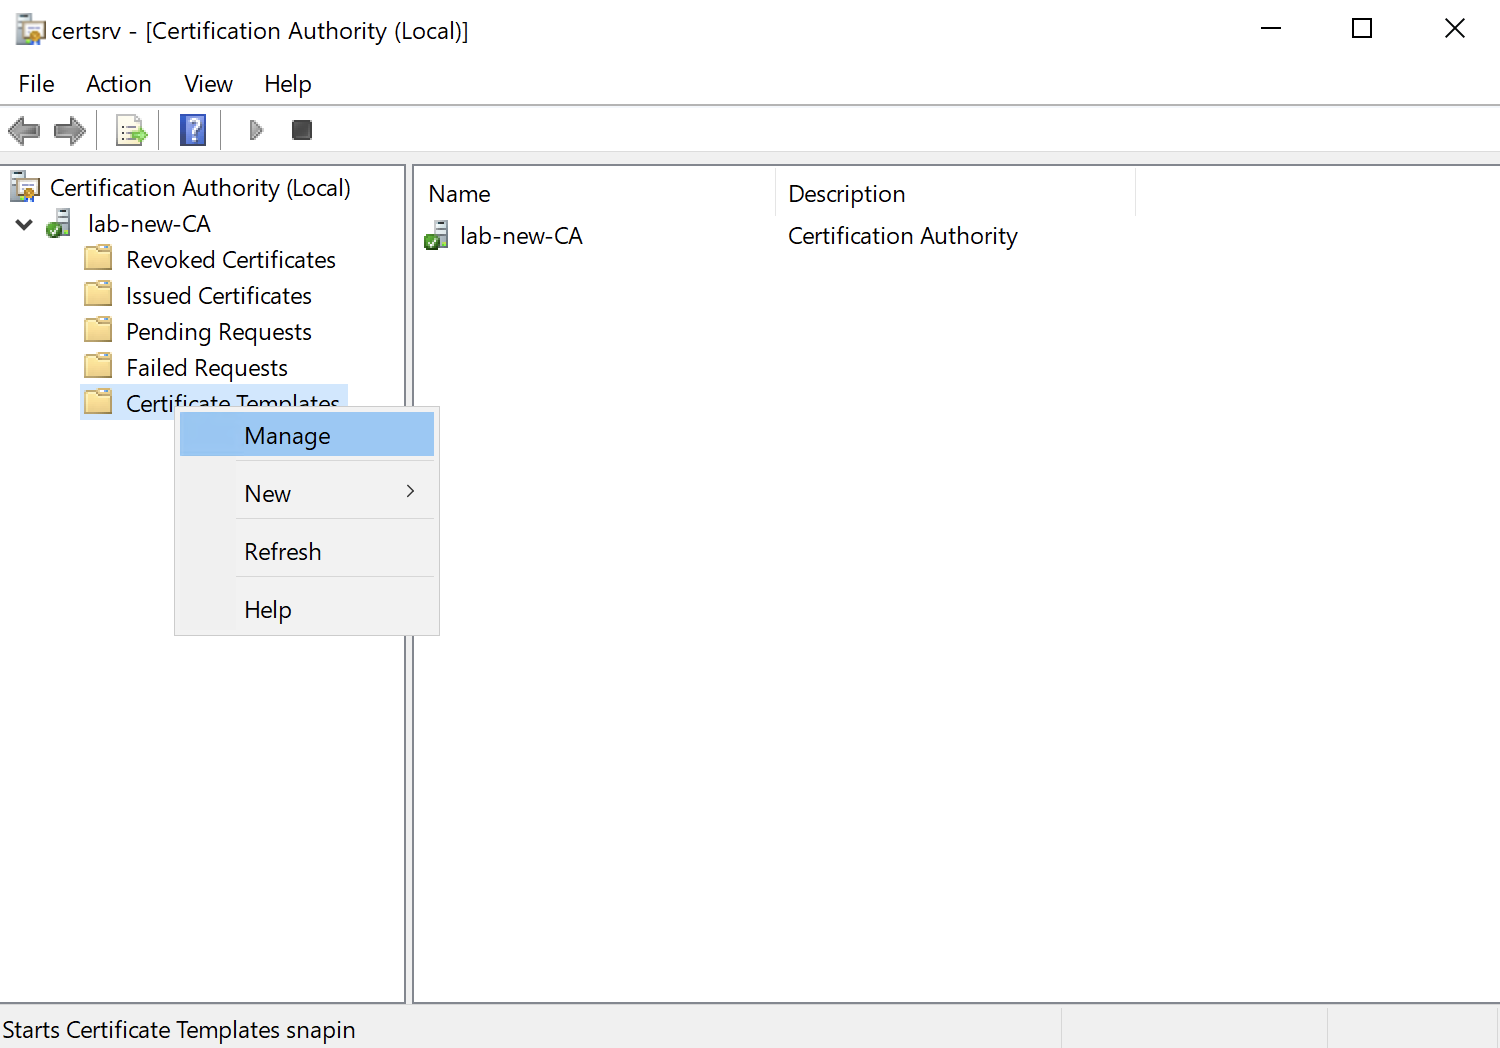
Right-click on the Computer template and select Duplicate Template. Then under the General tab, change the name and display name to signify its use:
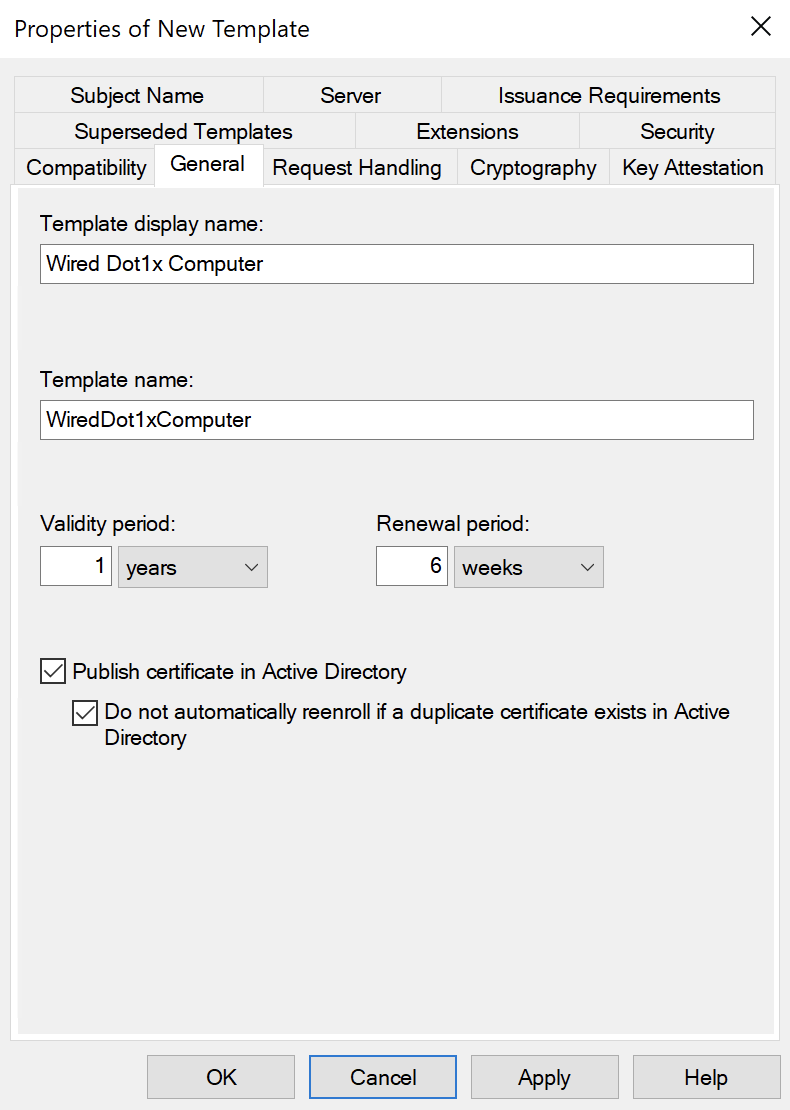
Also ensure both of the AD checkboxes are selected.
Under the Security tab, add the Domain Computers computer group:
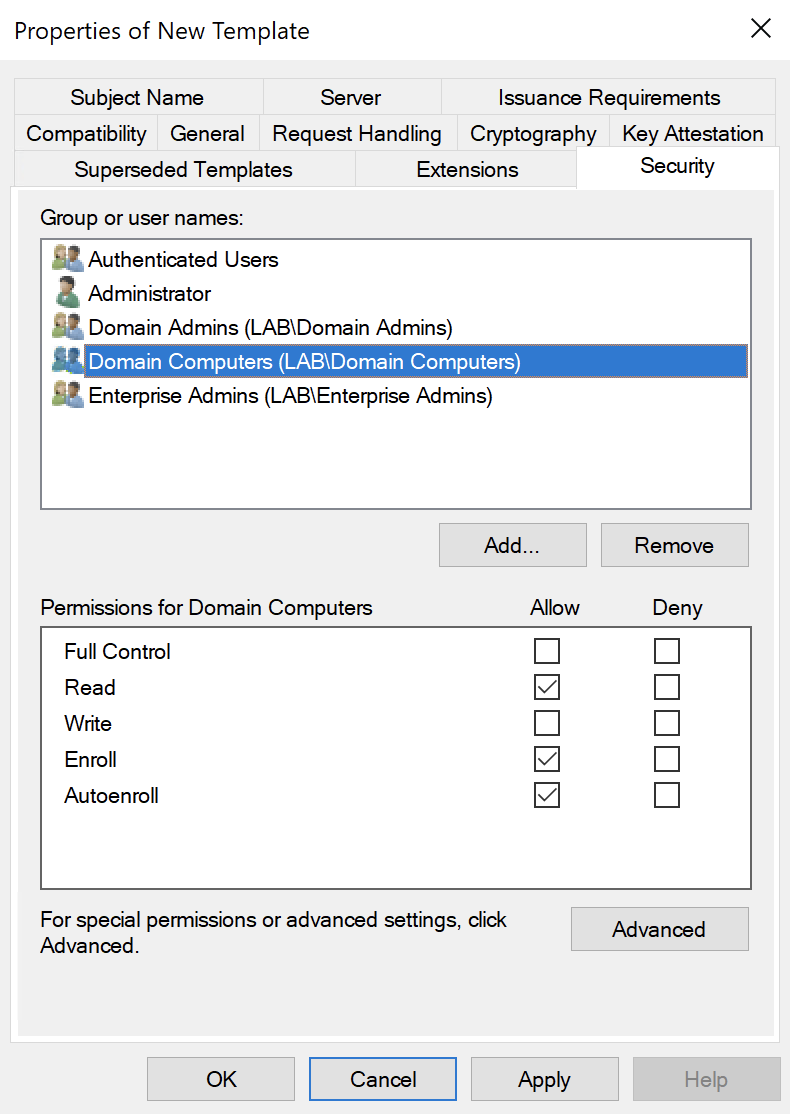
Add the Read, Enroll and AutoEnroll permissions.
Click OK to close the window.
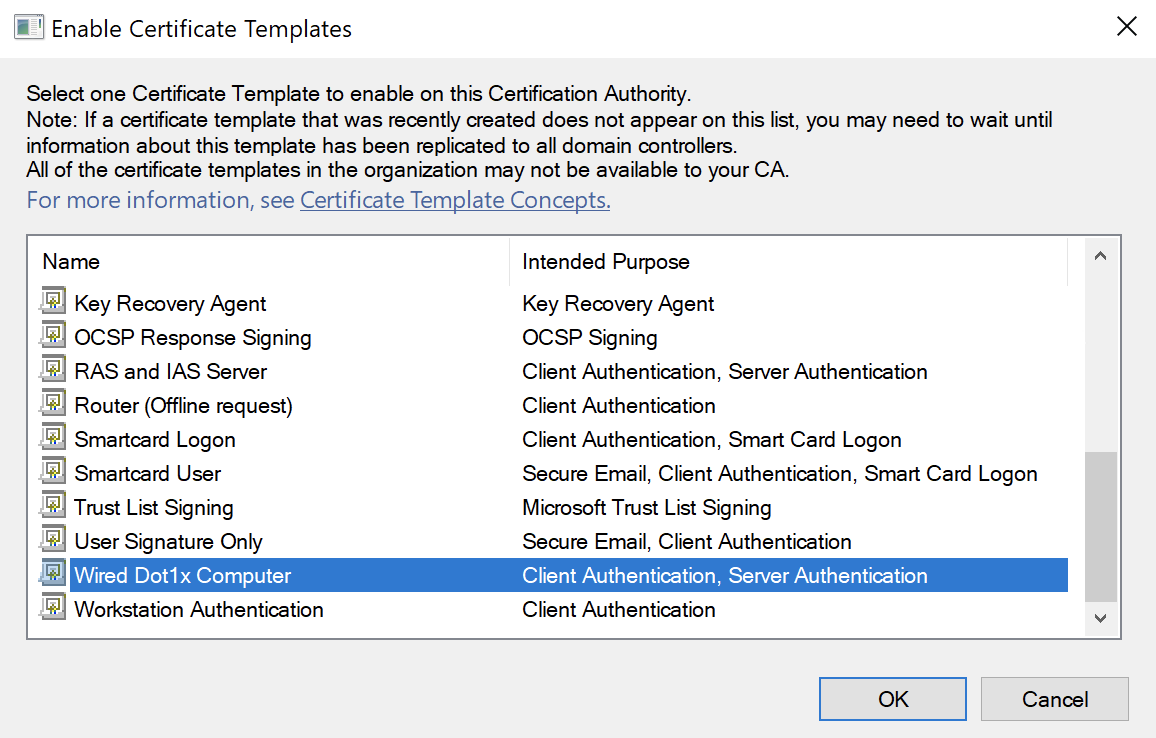
Back on the Certification Authority window, right-click on Certificate Templates and select New > Certificate Template to Issue
Select the Template we just created and click OK:
Right-click on the User template and select Duplicate Template. Then under the General tab, change the name and display name to signify its use:
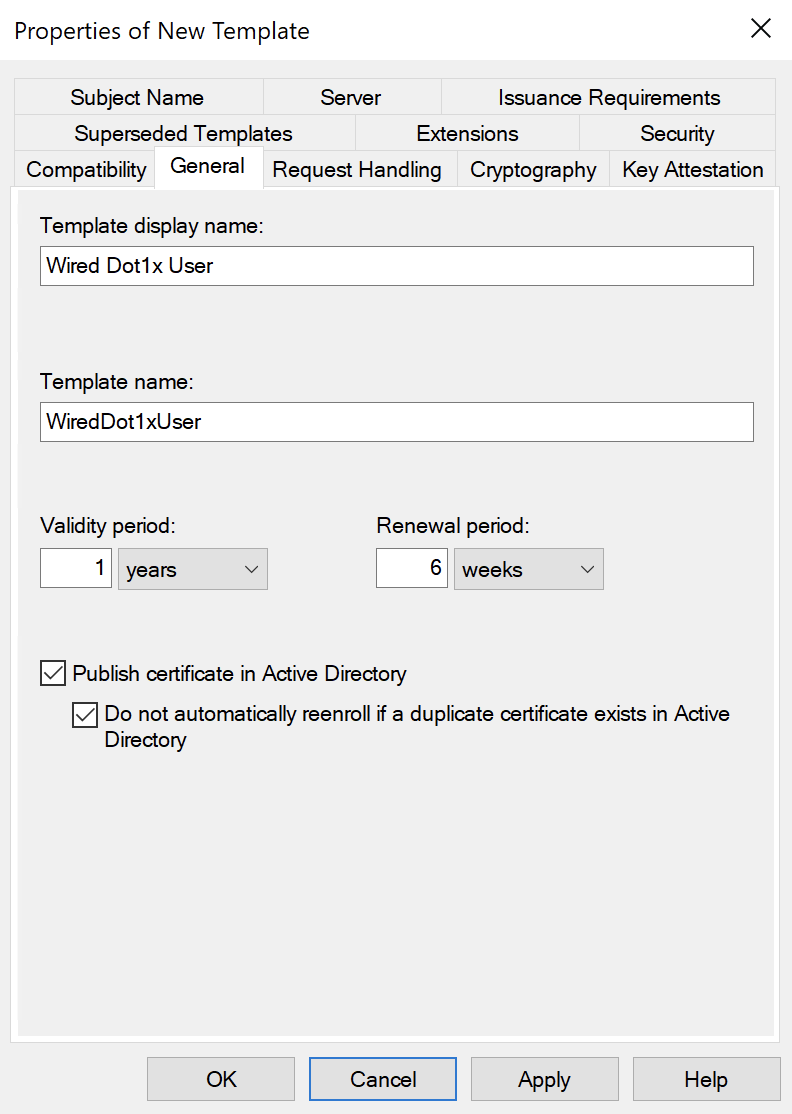
Again, ticking the boxes for AD Publishing.
Under the Security tab, select the Domain Users group:
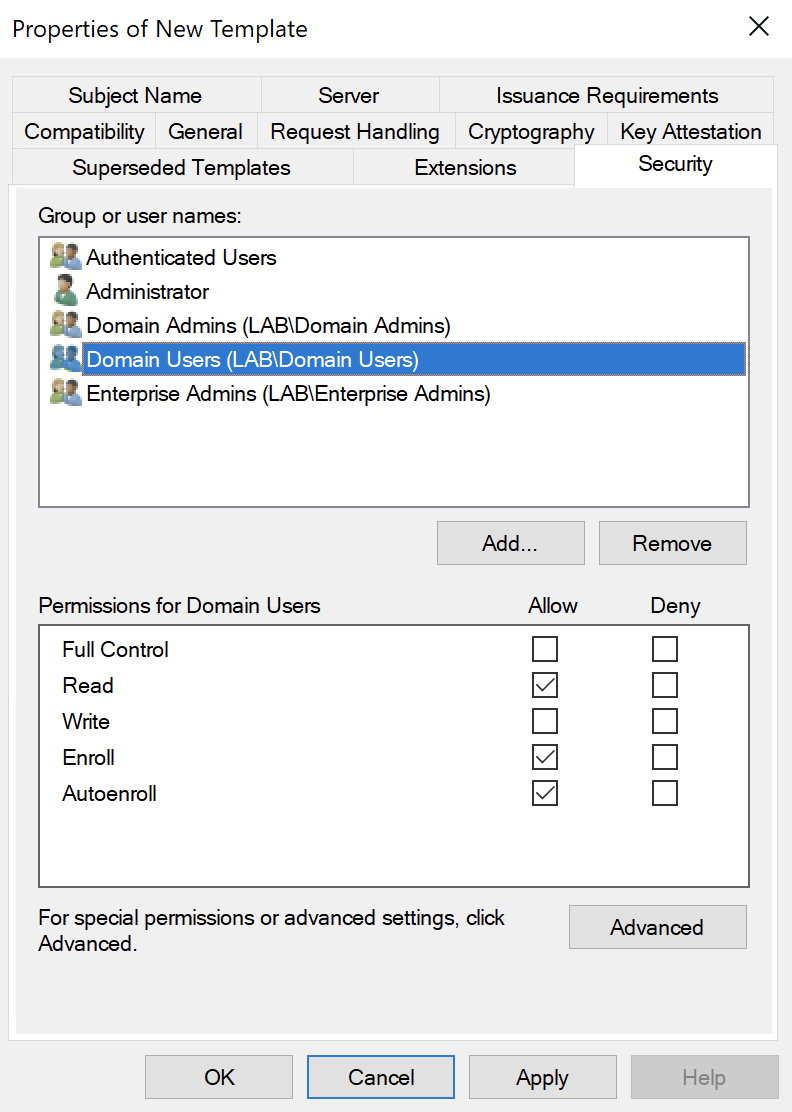
Add the Read, Enroll and AutoEnroll permissions.
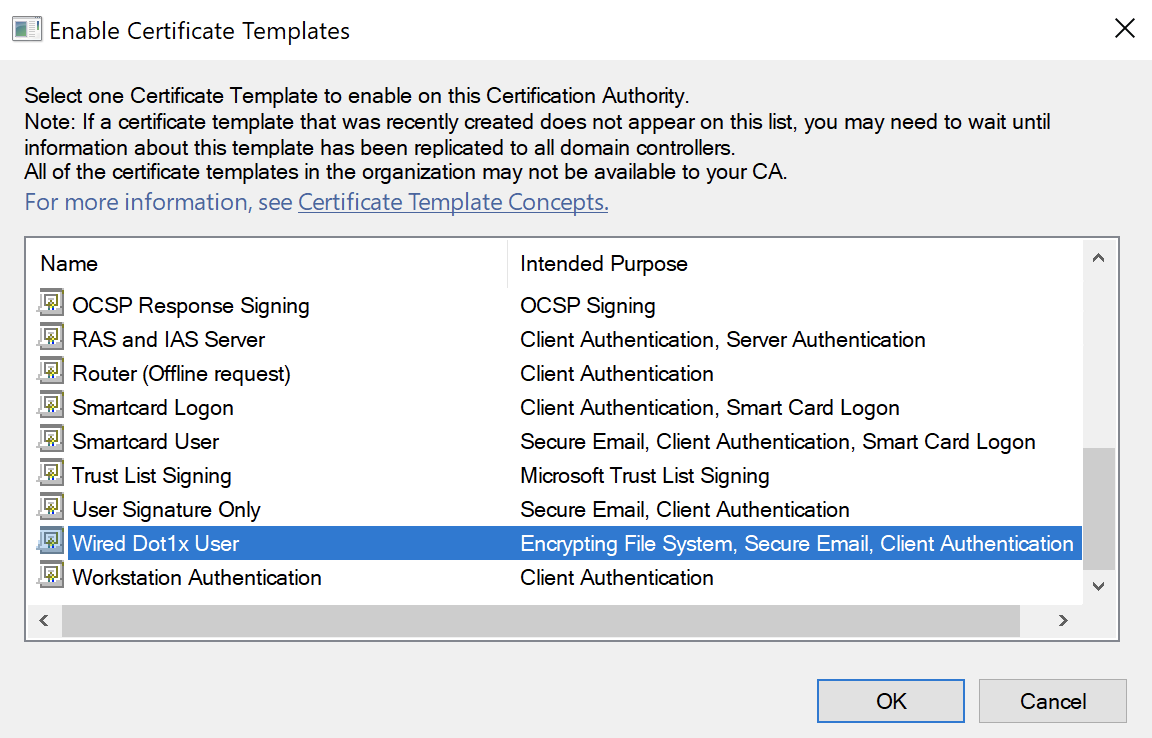
Back on the Certification Authority window, right-click on Certificate Templates and select New > Certificate Template to Issue
Select the Template we just created and click OK:
In all of the above, you can change the groups if you would rather not have all Domain Computers and Users get certificates. For the user certificate, make sure the users have an email address.
You can change this behavior on the Subject Name tab of the Template:
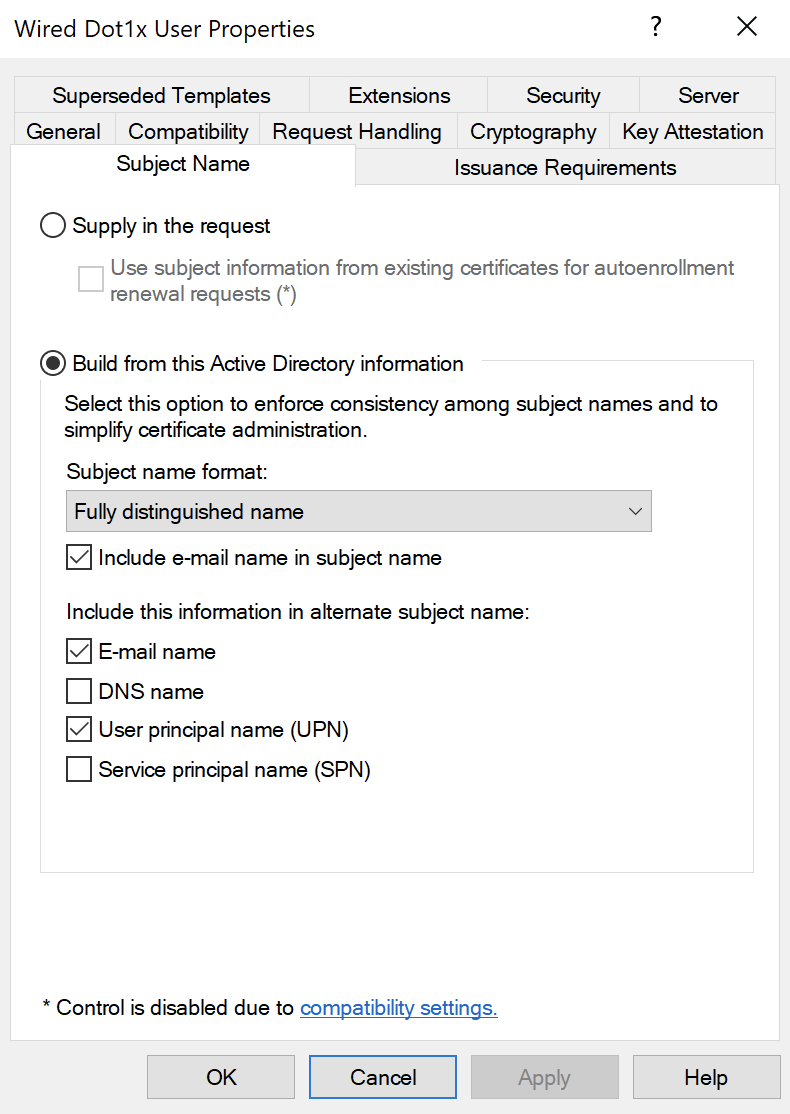
Uncheck 'Include e-mail name in subject name' and 'E-mail name' below.
Finally, we need to create a GPO in order for these to be enrolled automatically.
Create a new Group Policy Object:
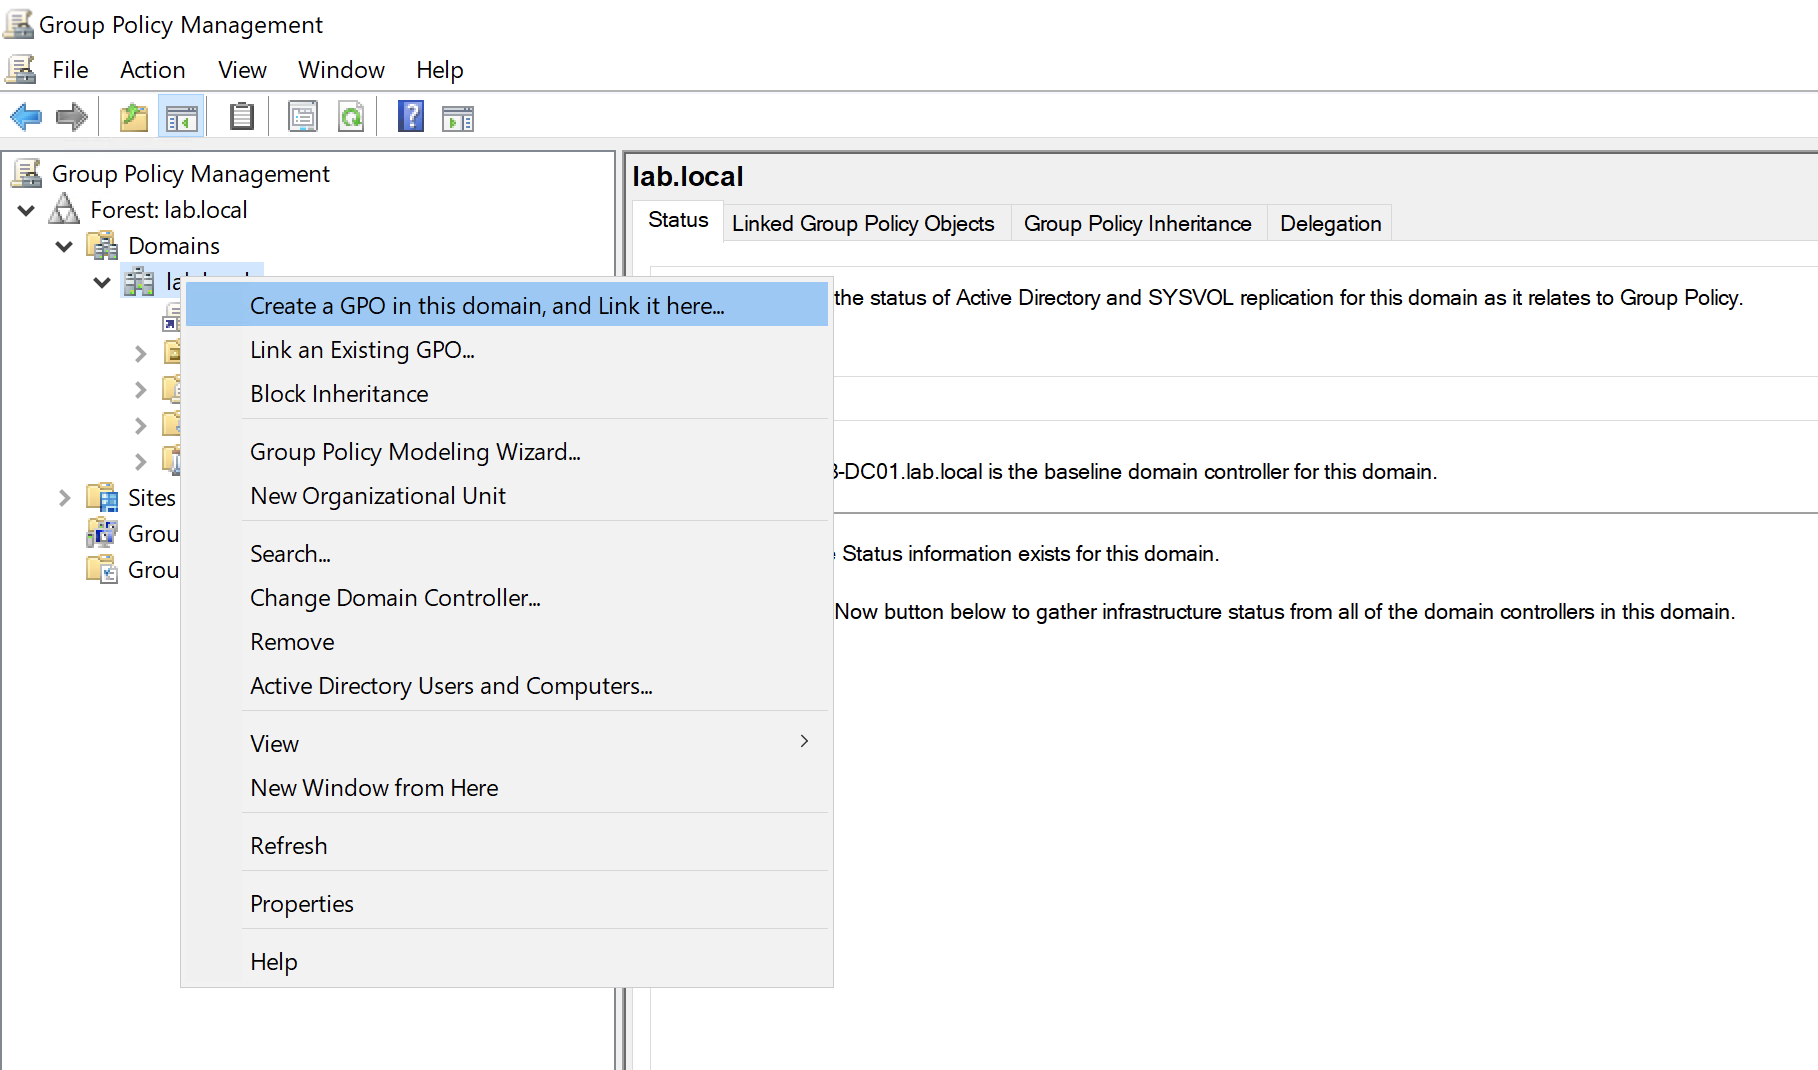
Give the Object a name and then edit it:
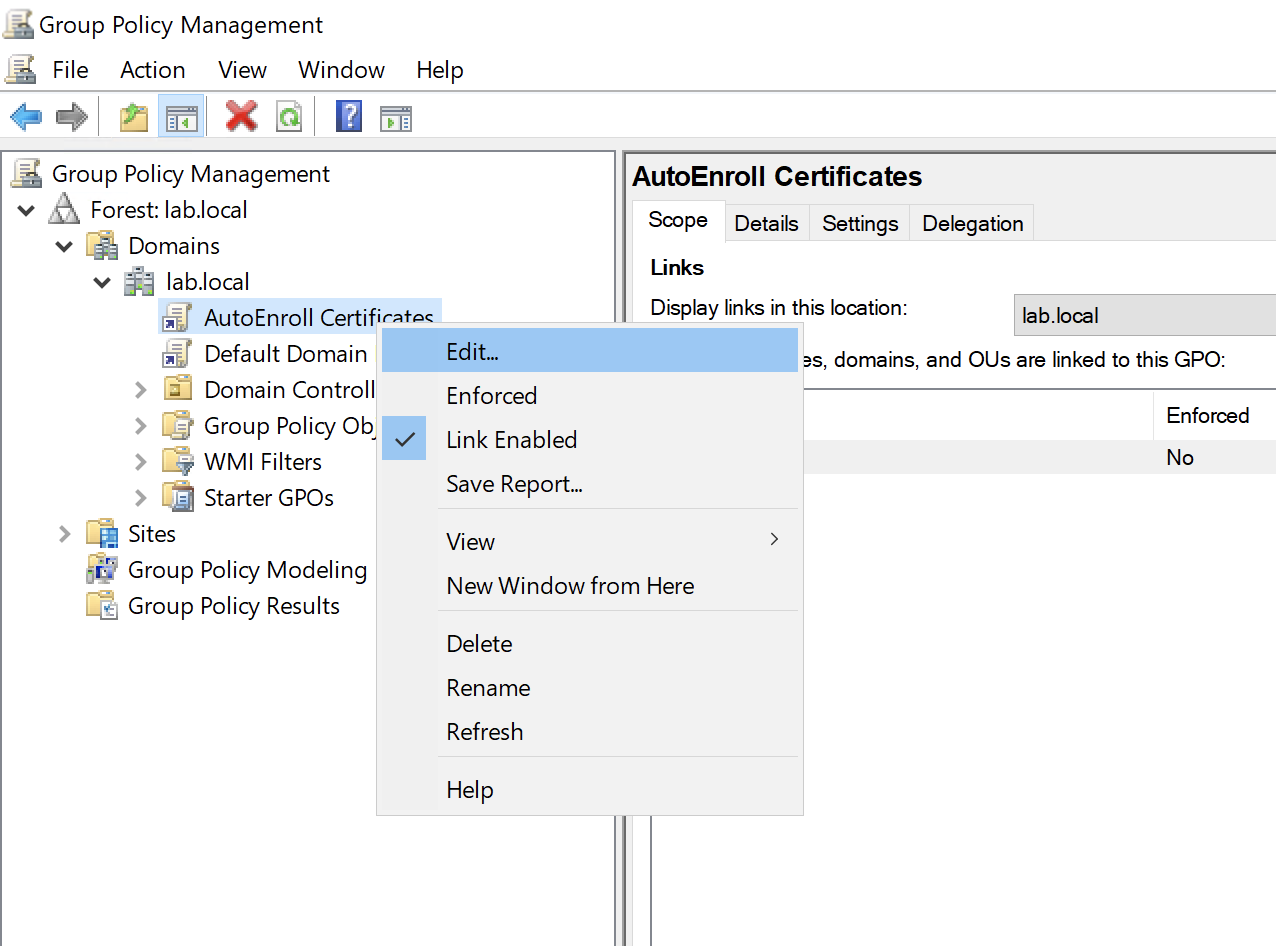
Under User Configuration > Policies > Windows Settings > Security Settings > Public Key Policies.
Right click on Certificate Services Client - Auto-Enrollment:
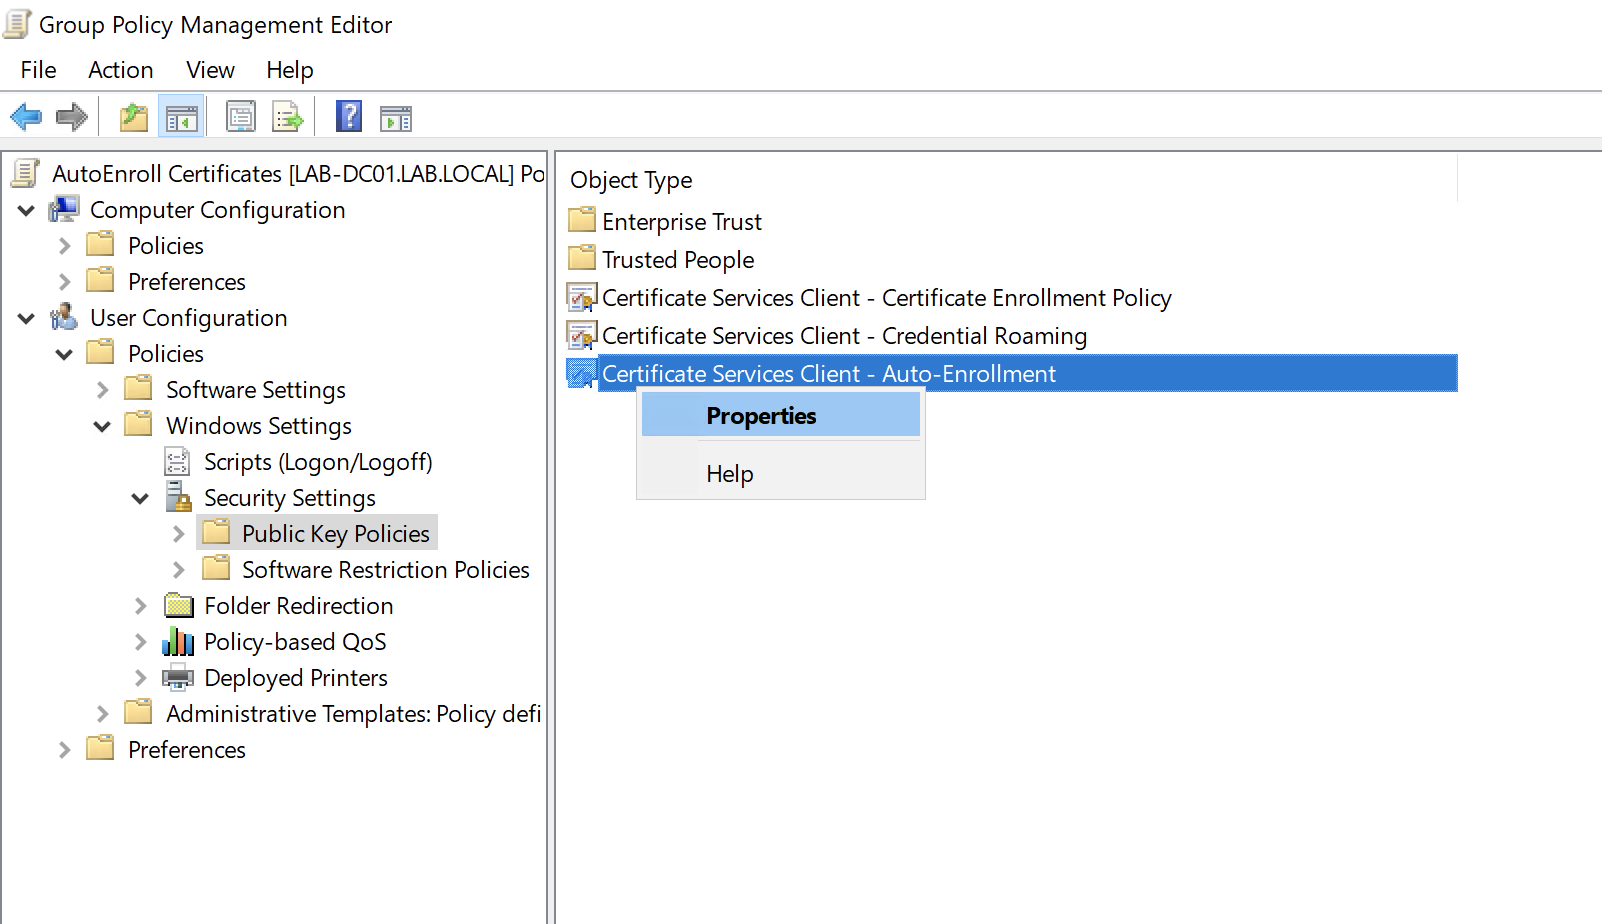
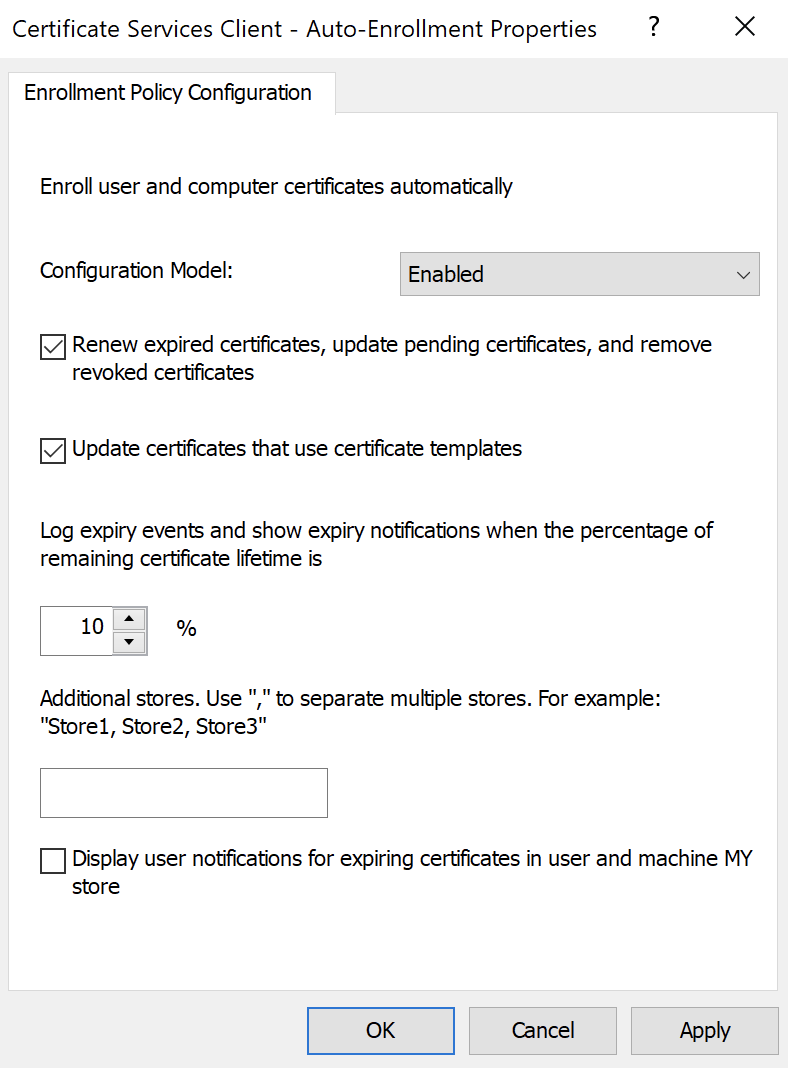
Configure the settings as per the below:
Under Computer Configuration > Policies > Windows Settings > Security Settings > Public Key Policies.
Right click on Certificate Services Client - Auto-Enrollment:
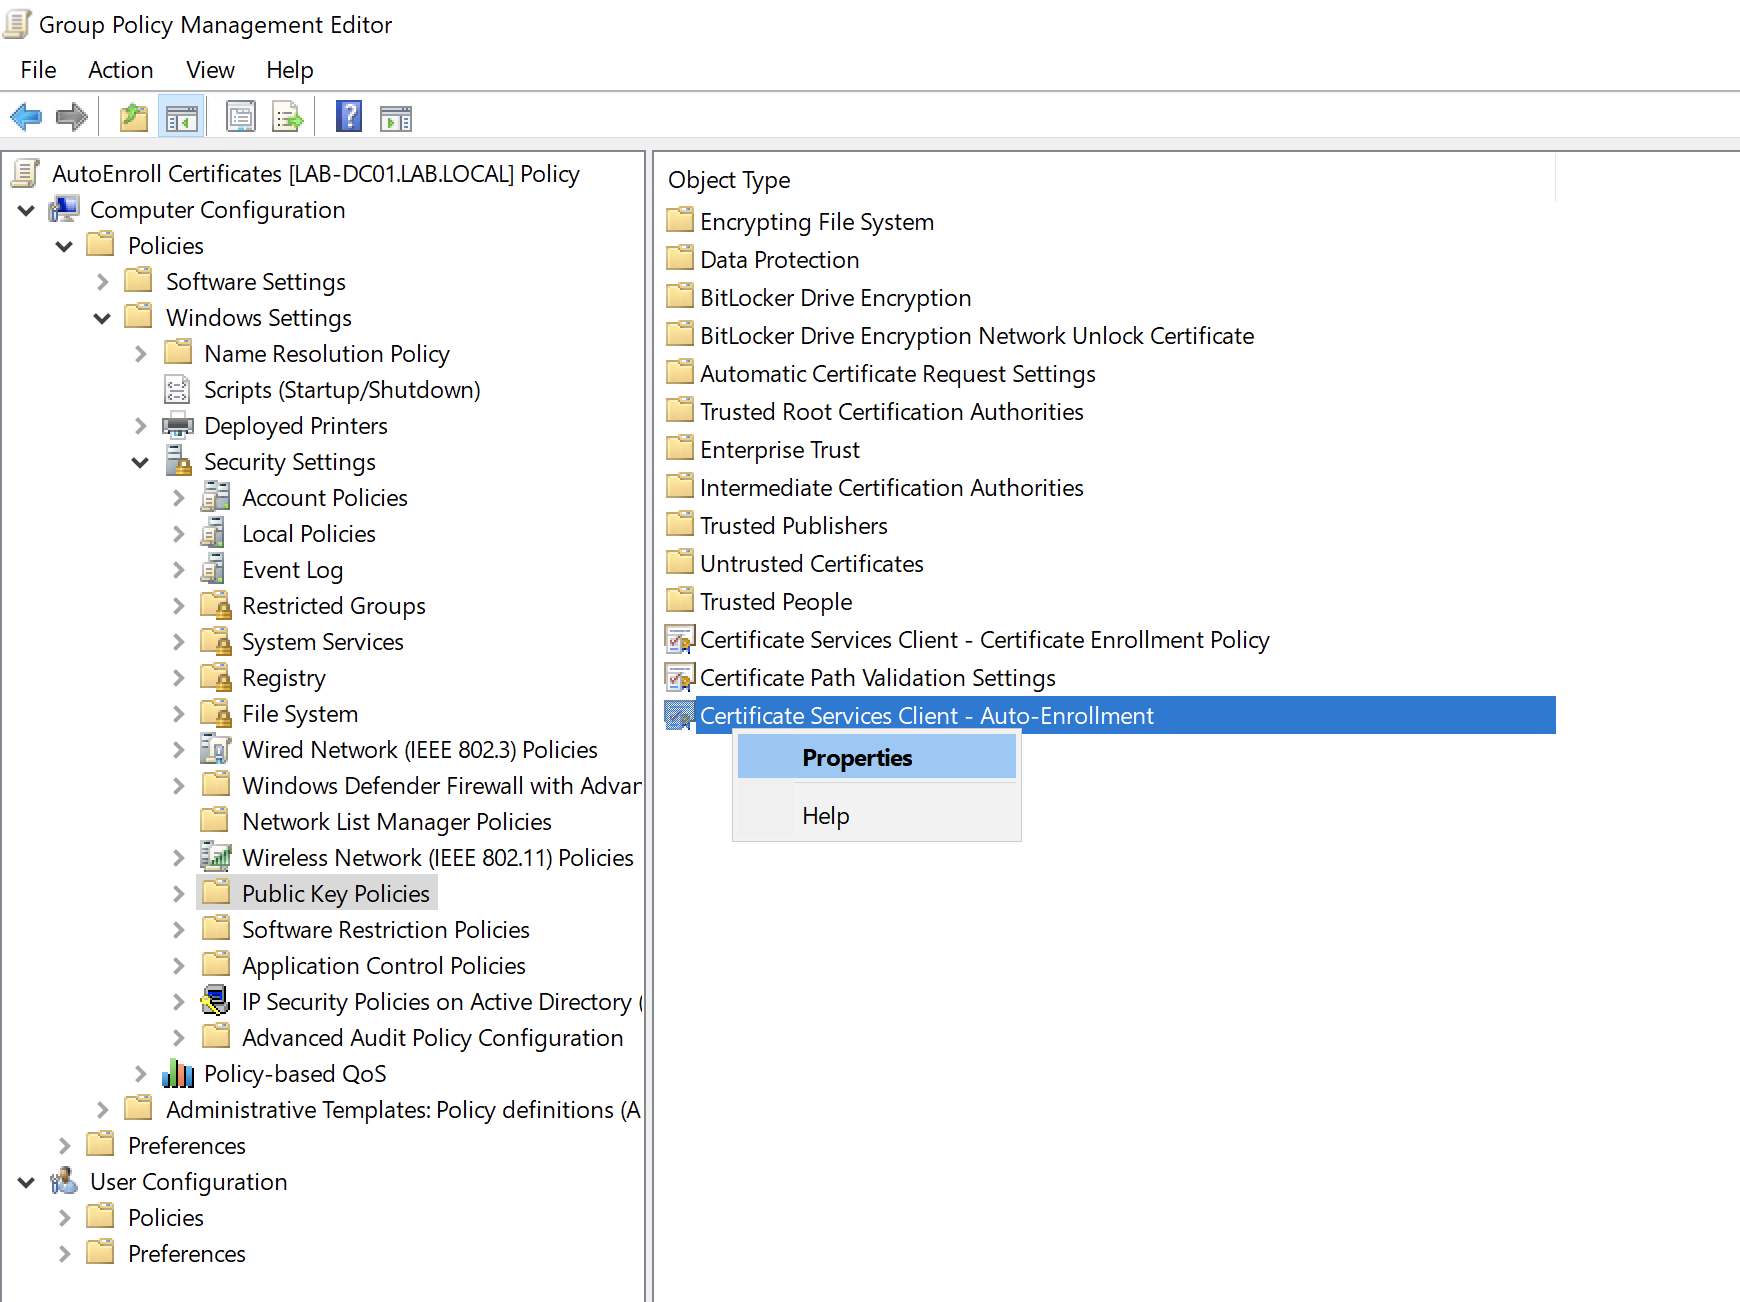
Configure the settings as per the below:

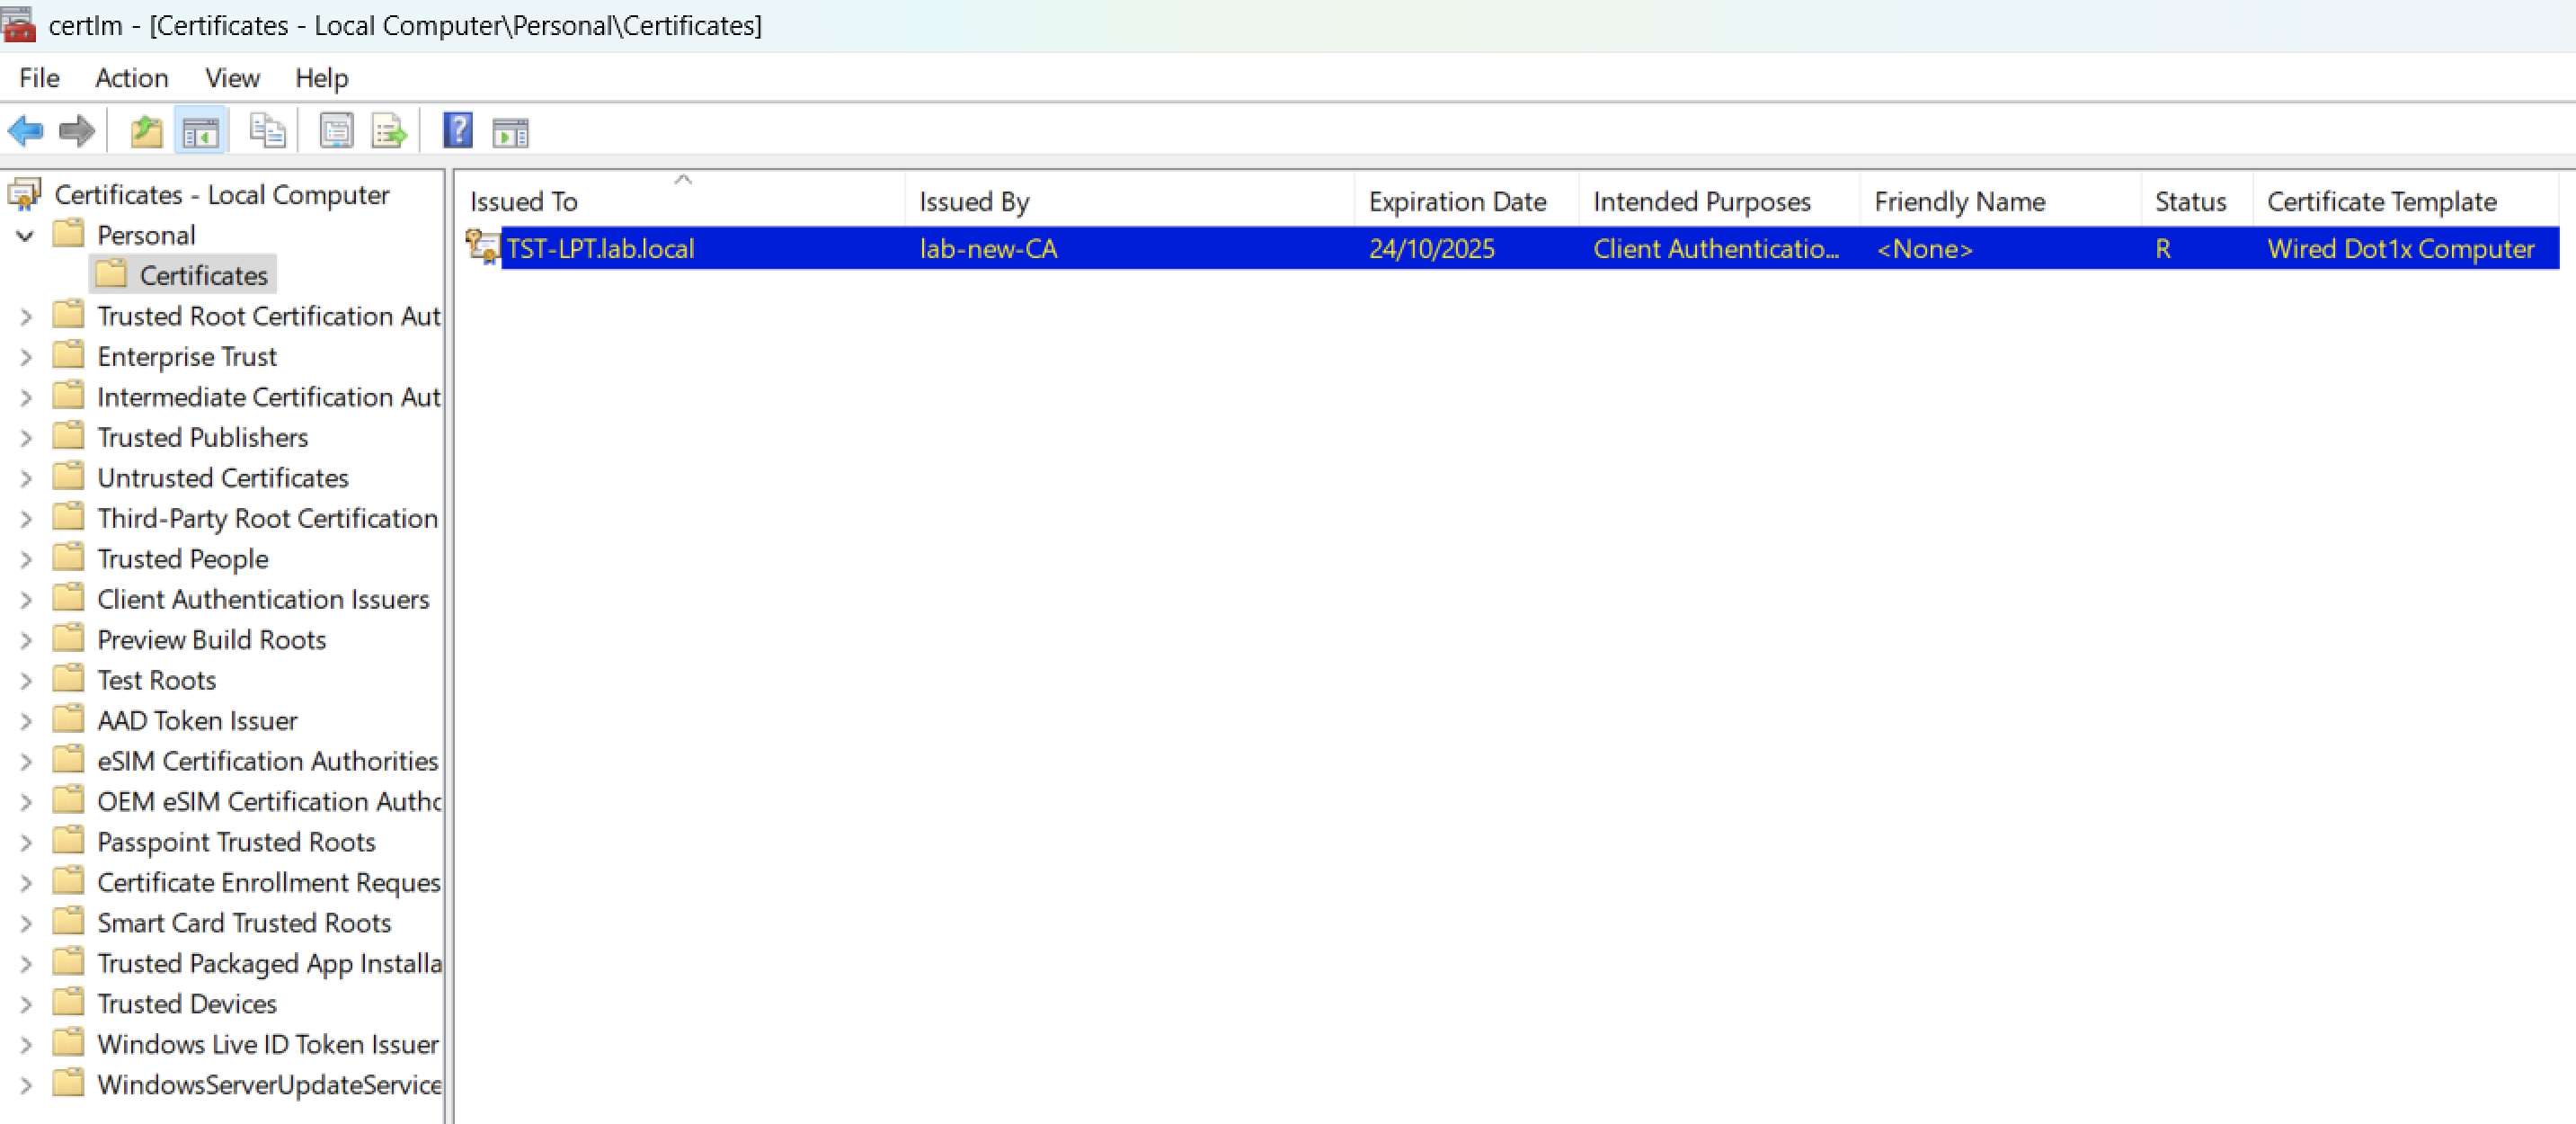
On a client machine, run a gpupdate /force and you should see the certificates appear for Local User and Local Computer:

Dot1x Group Policy Settings
The final part of the configuration is to setup the GPOs on the lab.local domain so that our test machine knows the settings it needs.
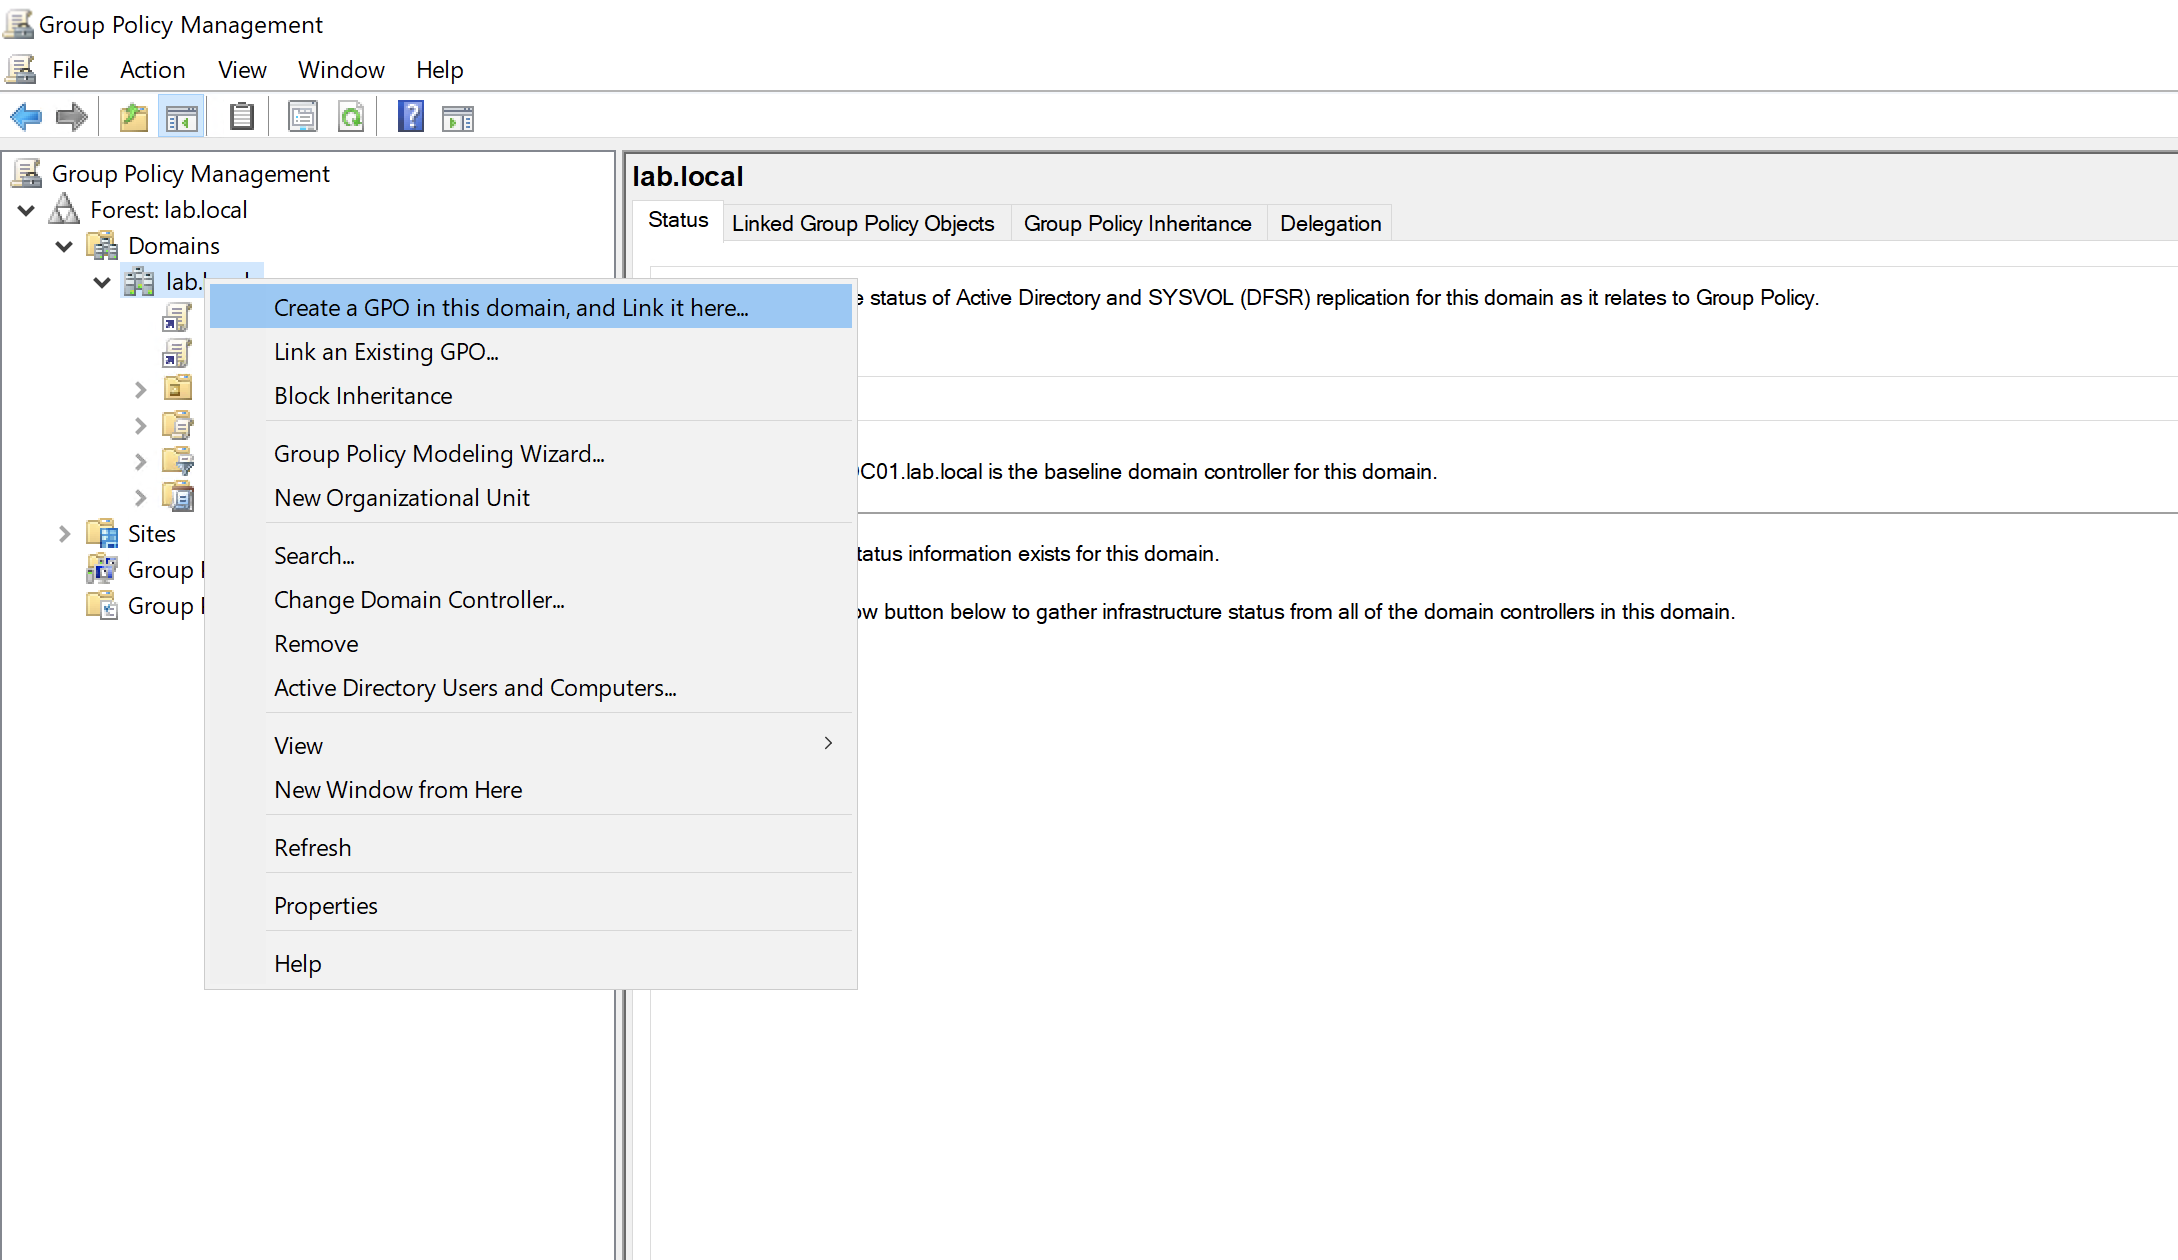
Open up Group Policy Management for the domain and create a new GPO:
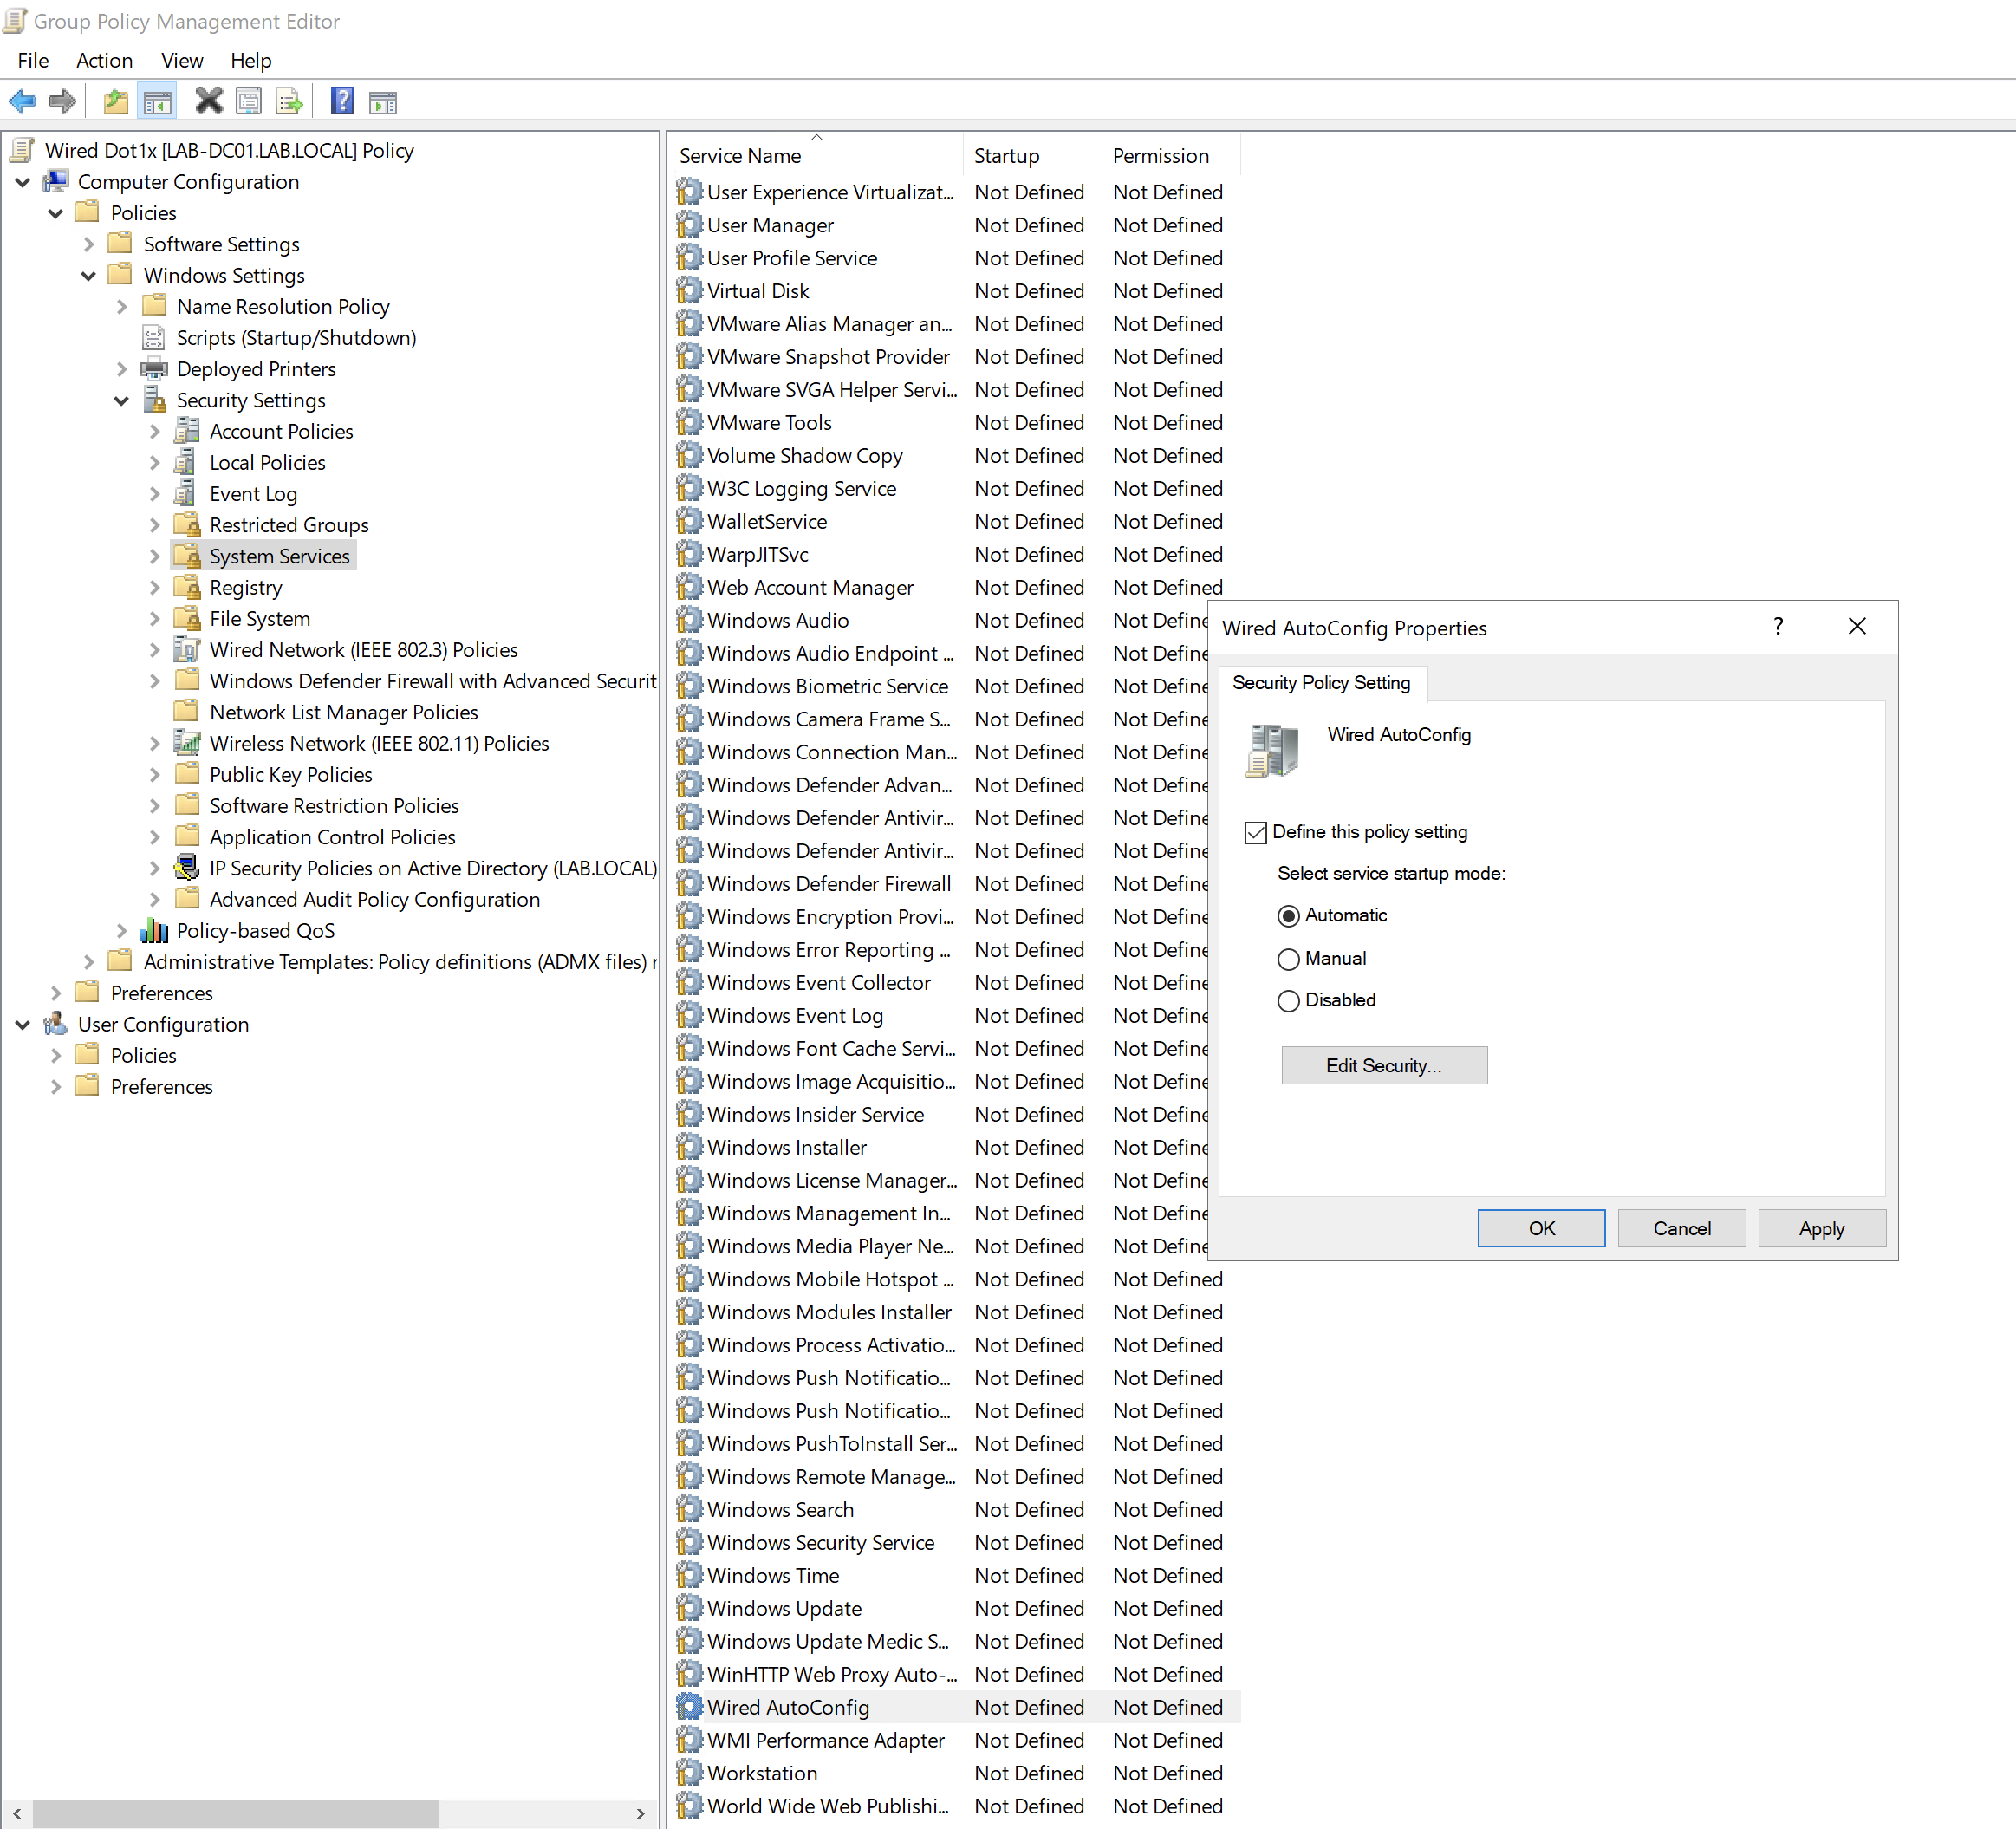
Edit the policy and navigate to Computer Configuration > Policies > Windows Settings > Security Settings > System Services
Locate the service Wired AutoConfig and set the mode to 'Automatic'.
Navigate to Computer Configuration > Policies > Windows Settings > Security Settings > Wired Network (IEEE 802.3) Policies
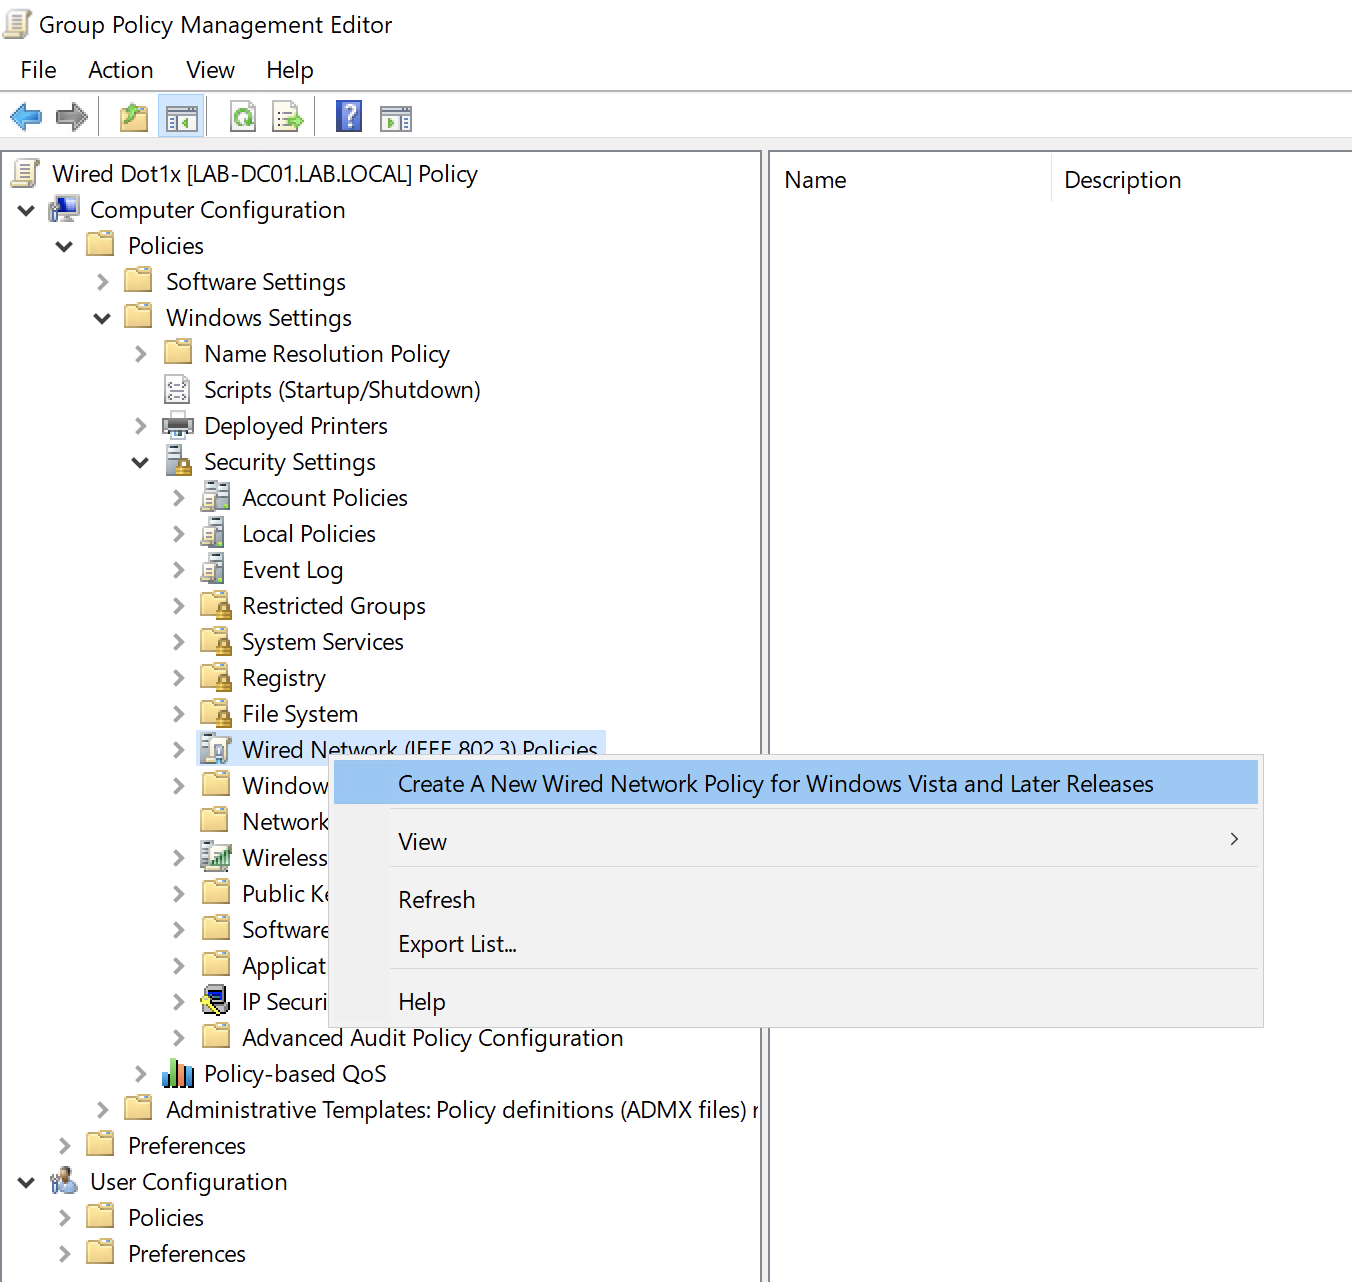
Give the policy a name:
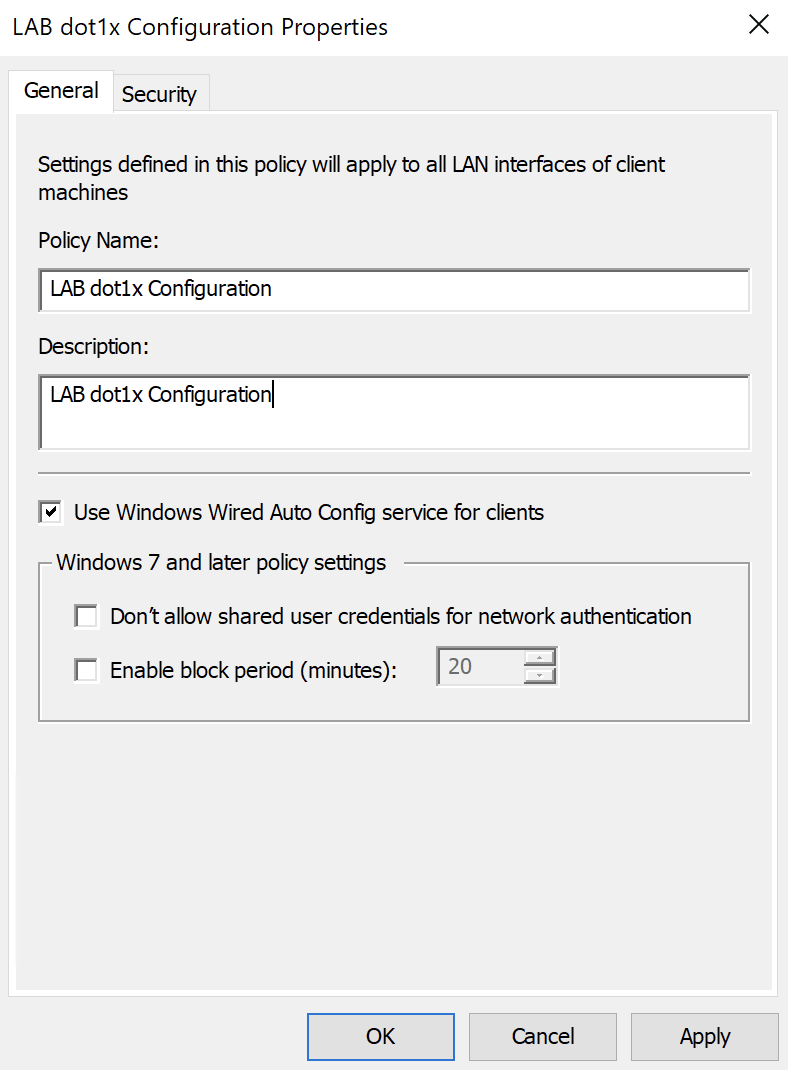
Under the Security tab, set the method to 'Microsoft: Smart Card or other certificate':
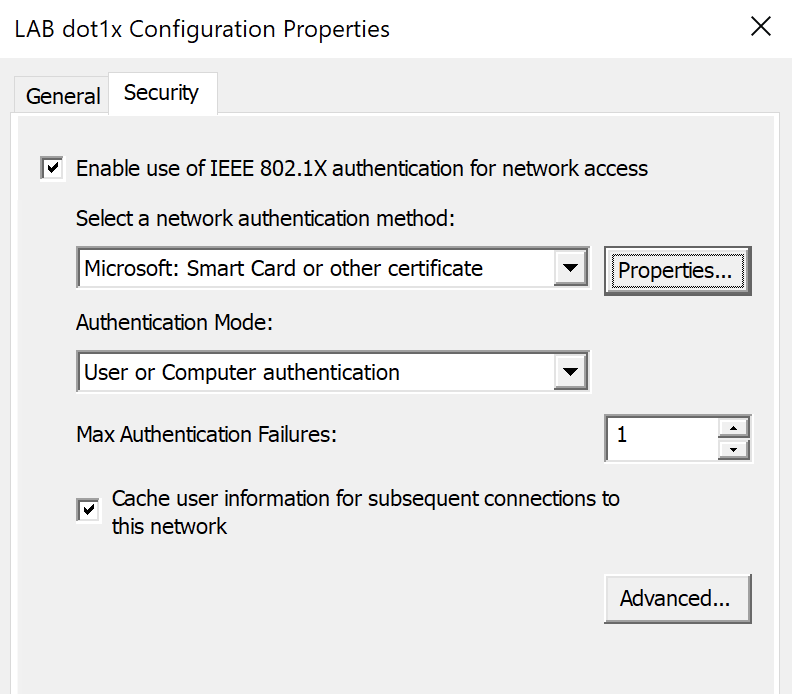
Click on Properties next to the method:
Tick the CA Certificates that was used to sign the certificates:
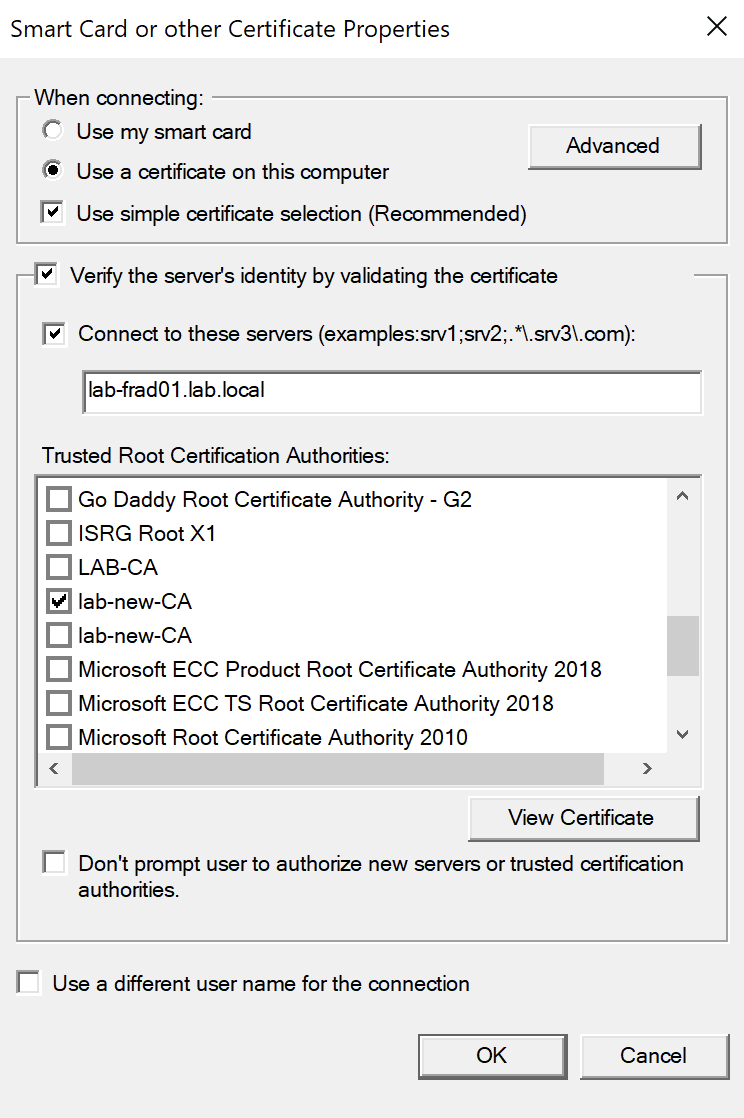
Its also a good idea to set the server name too, so that we only allow authentication attempts to the lab-frad01 server. Ensure this matches the common name on the server certificate you created for FreeRadius.
There are multiple instances of lab-new-CA in the list. However, they are the same CA so we only need to select one of them.
For extra granularity, click the Advanced button on the 'When connecting' section:
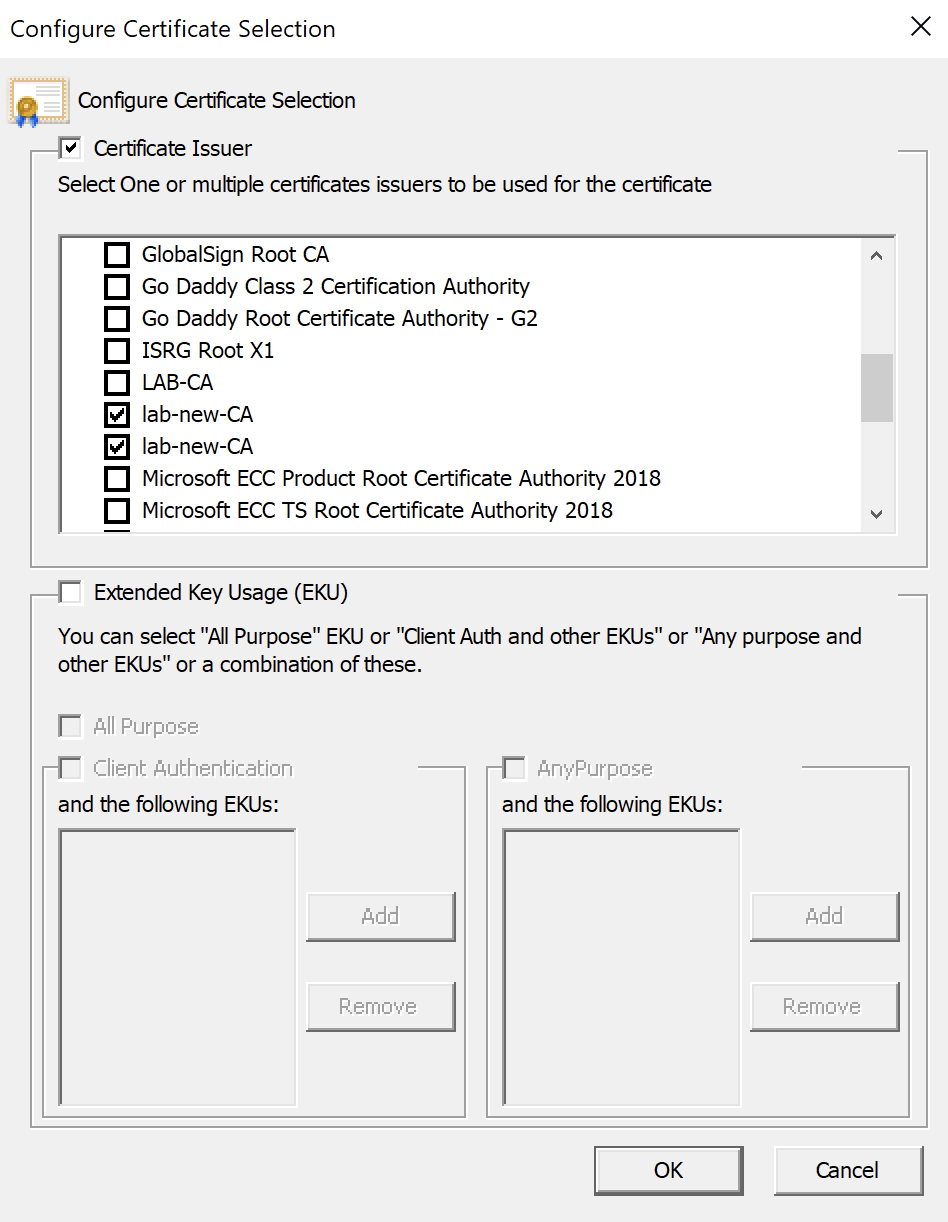
Here we should tick the certificate issuers we want to use for passing to FreeRadius. Above I have selected the internal CA as expected.
Click OK and then OK again to save the GPO.
Testing and Verification
Thats all the configuration we need to setup Wired 802.1x.
Lets jump onto the laptop and connect it to a non-dot1x enabled port in order to complete a gpupdate /force. This should force the machine to download the policy from AD.
With the settings we have used in the GPO. When the machine is at the login screen, it will use the machine certificate, and then once a user has logged in, the users certificate should be used. We can see this on the switch using show commands too.
I can't easily show the laptop at the login screen, but we can see from the following show command what the device has authenticated as:
dot1x-rtr#show authentication sessions interface g0/1/0 details
            Interface:  GigabitEthernet0/1/0
               IIF-ID:  0x05ACA06A
          MAC Address:  4ccc.6adb.e5ec
         IPv6 Address:  Unknown
         IPv4 Address:  Unknown
            User-Name:  host/TST-LPT.lab.local
               Status:  Authorized
               Domain:  DATA
       Oper host mode:  single-host
     Oper control dir:  both
      Session timeout:  N/A
    Common Session ID:  D900A8C000000012BFDDACA9
      Acct Session ID:  0x0000000f
               Handle:  0xc5000008
       Current Policy:  POLICY_Gi0/1/0

Local Policies:
        Service Template: DEFAULT_LINKSEC_POLICY_SHOULD_SECURE (priority 150)
      Security Policy:  Should Secure
      Security Status:  Link Unsecured

Server Policies:

Method status list:
       Method           State
        dot1x           Authc Success
Above, we can see the device has authenticated as host/TST-LPT.lab.local which is a good identifier its using the device certificate, which is expected.
Then, if we login as a user:
dot1x-rtr#show authentication sessions interface g0/1/0 details
            Interface:  GigabitEthernet0/1/0
               IIF-ID:  0x05ACA06A
          MAC Address:  4ccc.6adb.e5ec
         IPv6 Address:  Unknown
         IPv4 Address:  Unknown
            User-Name:  [email protected]
               Status:  Authorized
               Domain:  DATA
       Oper host mode:  single-host
     Oper control dir:  both
      Session timeout:  N/A
    Common Session ID:  D900A8C000000012BFDDACA9
      Acct Session ID:  0x00000012
               Handle:  0xc5000008
       Current Policy:  POLICY_Gi0/1/0

Local Policies:
        Service Template: DEFAULT_LINKSEC_POLICY_SHOULD_SECURE (priority 150)
      Security Policy:  Should Secure
      Security Status:  Link Unsecured

Server Policies:

Method status list:
       Method           State
        dot1x           Authc Success
We can see this has changed to [email protected] which shows we are now using the user certificate.
Windows also shows us that we are connected and signed in:

One caveat here, if its the first time the user has logged in, the user certificate may not be generated as the device will switch from the computer cert and fail to authenticate to the network as the user cert doesn't exist:
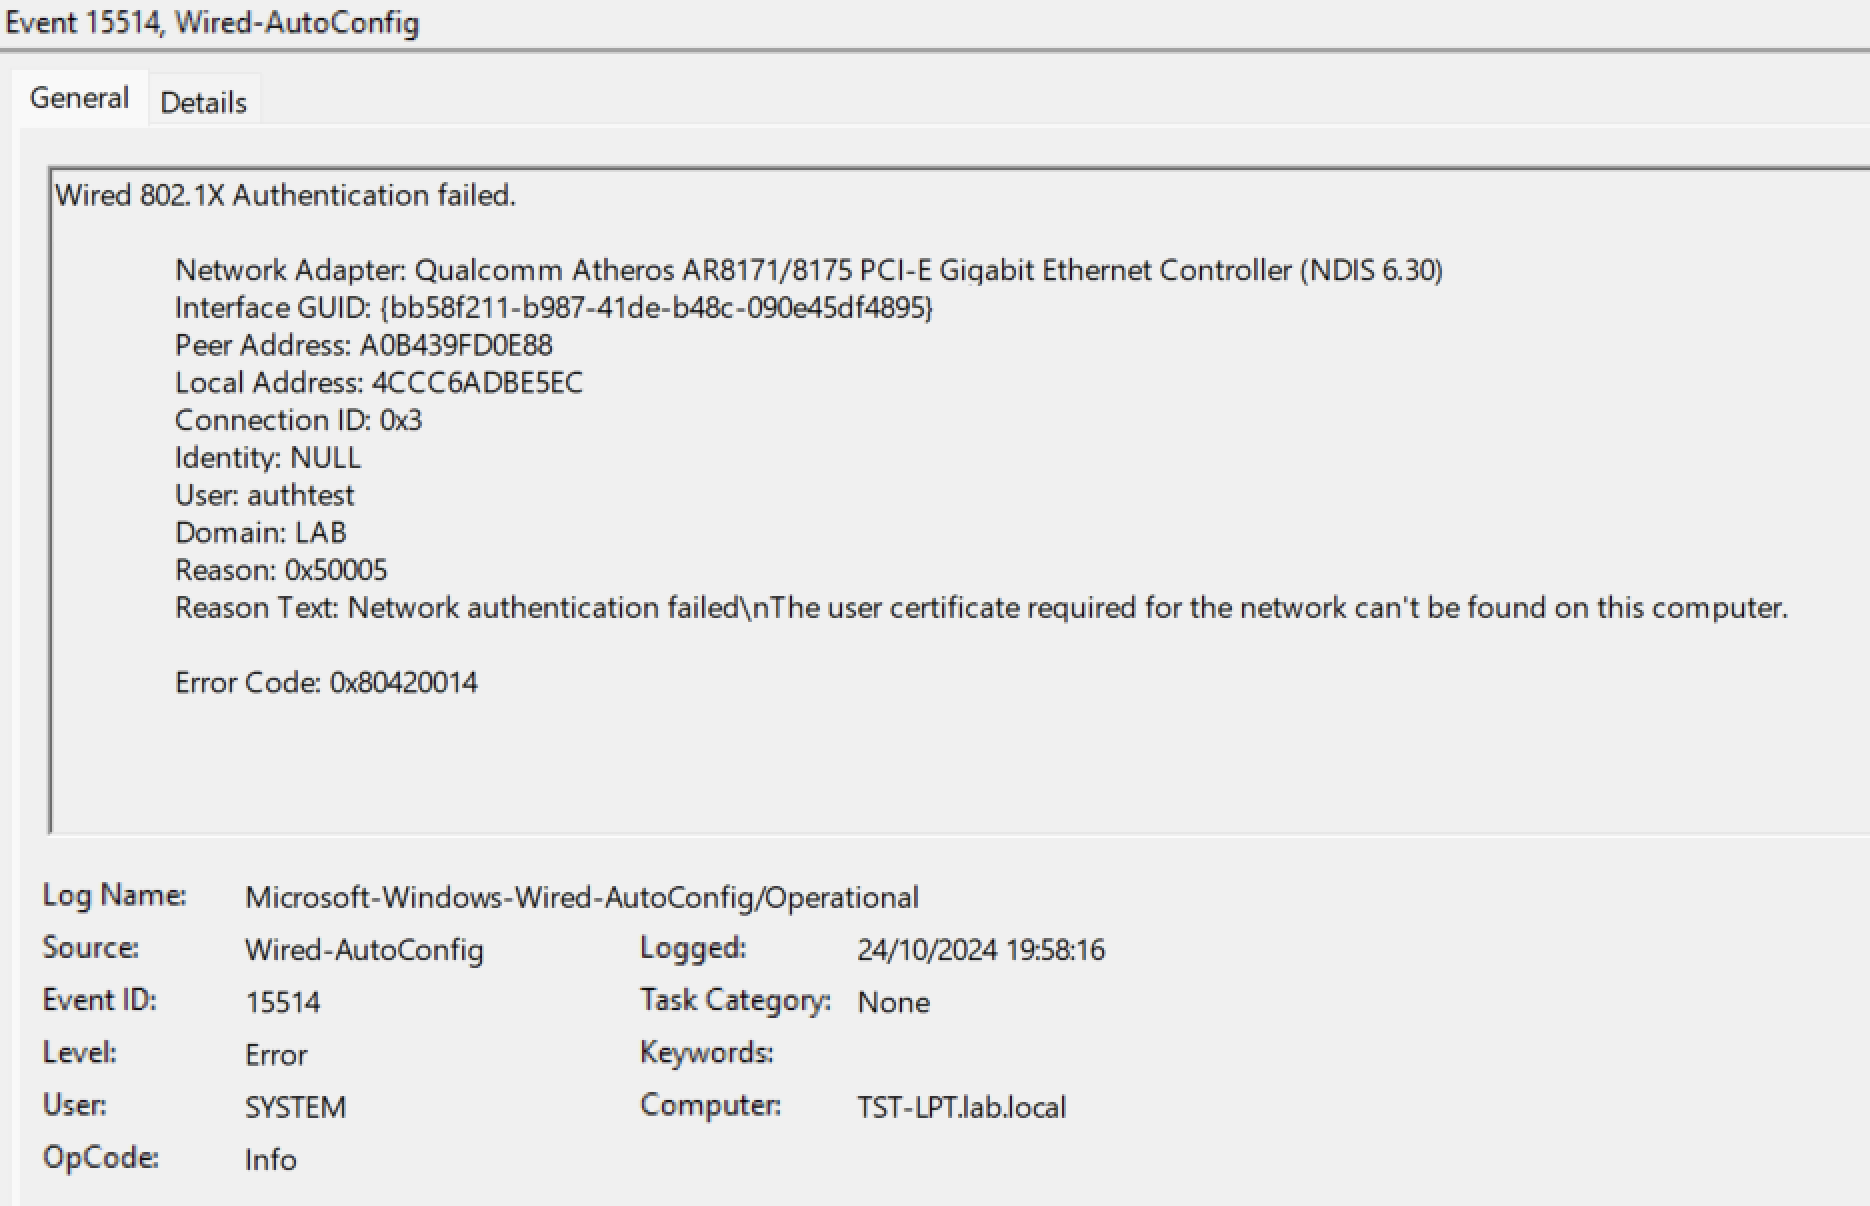
In this case, its sometimes less painful to switch to device only certificates as we know these are present. Or have the first logon be on a non-dot1x network. Neither of which are elegant solutions.
But, there you go, thats the setup of 802.1x from start to finish. I did hit some interesting curveballs with some of the older lab switches I have. The exact same configuration on a 3750-X on its latest firmware refused to work. So watch out for that if you are testing this in a lab and using more dated equipment. The specific issue with the 3750-X was that it wasn't relaying a RADIUS Access-Request to FreeRadius, despite me being able to see the client was sending an EAP-Response... weird!

0 Comments